While working on Part 2 of this article on ISO and Image Quality, I thought it was a good idea to set the stage with a few random thoughts and a basic challenge. Thinking about it, every photographer should develop the ability to analyze digital images. A good understanding of the digital camera and the ability to apply this knowledge benefits all digital photographers...
Taken at a constant luminance perspective and a variable image signal amplification
Taken at a constant image signal amplification (ISO3200)
You are welcome to try the following challenge. Place an A4-sized white paper against the wall and your camera on a tripod. The challenge is to recreate the above 2 illustrations. The info needed to create a basic plan, take the images, and build the final illustrations is all in this article.
Olympus Pen F with 25mm f1.4 Leica, ISO80(Low), f3.5, 1/1600 - Edited in DxO PL-4 (See more info further down...)
Here are a few general questions for you:-
Prep a short explanation of what happens inside the camera for each illustration
Think of a few examples and list the benefits of knowing your digital camera...
Why do you think it's safe or not safe to use the ISO Low, L100, or L64 options?
Most social media experts tell us it's not OK to use ISO Low, L100, or L64. why?
Which of the 5 images in each of the above illustrations are 18% gray samples?
What is the link between the Zone system, 18% gray exposure, and the ISO setting?
Study the photons/electrons graph below. Does it apply to all or only some sensors?
A few general thoughts...
The reason photographers should distrust any sensor size references is all image sensors have noise. What determines this noise? Most photographers are never told that all sensors have a native noise floor. This is likely the reason for no discussions about advanced digital photography techniques, like how to use ISO amplification strategically, or how to manage the sensor's saturation (SNR).
Why do photographers prefer the analog photography Exposure Triangle? Especially when it's used to train photographers on digital cameras? How will they ever master advanced digital camera skills like SNR, sensor saturation, or image signal amplification with an outdated triangle?
Is size a reasonable measure for IQ? We know pixel area (size) is one of many variables impacting the Optical Efficiency of the image sensor. So why focus only on only one of many variables? Well, looking for answers is like finding a needle in a haystack. For instance, a more reliable way of rating image sensors is Sensor Sensitivity (Optical and Quantum Efficiency).
To illustrate the oversimplicity of the "size and capture" theory, study the illustration below. This illustration offers more information about the image sensor, the noise elements in the sensor, the noise floor, and the effective dynamic range of the sensor. Other than the "size and capture" theory, which cannot explain shadow noise, those who master the principles illustrated below will have a better theoretical foundation. They will improve their analysis skills and sensor performance.
For example, take a moment and consider the graph below. The horizontal axis is the reflected light or photons hitting the sensor. The vertical axis represents the converted electrons. The sensor's full saturation capacity is reached with a fully exposed sensor. Plot the saturation for shadows or low-light scenes. How does this impact the performance of the image sensor? What happens to the SNR in the shadows? What does the histogram look like for an under-exposed sensor? These are simple questions every digital photographer should be able to answer...
Does the size of the sensor backplate "capture" photons? The answer is NO! We know pixels capture photons, and pixels (photocells) convert photons into electrons. This is the main reason why scientists improve pixel (photocell) sensitivity and why they don't focus on larger sensors. That said, the size of the sensor does play a role. Any idea what? Think of image effects like background blur.
Olympus photographers are familiar with 12MP or 20MP (MFT) sensors. The pixel diameter of 12MP sensors is almost double that of 20MP sensors. We know the EM1 III has one of the most sensitive M43 sensors and delivers far superior IQ to any of the older 12MP MFT sensors. Ever wondered why? Could one of the reasons be that sensors with lower Temporal Noise have cleaner images?
Study DxO Mark results for the EM1 II sensor.
The more we learn, the more we see what happens with image quality...
Another illustration with info on how to manage the sensor at ISO3200.
Let's talk about the physical size of mirrorless cameras.Does the size of the image sensor influence the physical size of the camera?The reason is the lens image circle has to cover the full sensor. This impacts the size of the lenses, the camera energy needs, heat management, and the effectiveness of features like IBIS. Digital cameras are basically built around the image sensor. The penalty for cutting corners is heat, lower efficiencies, and less reliable cameras and lenses.
Separately from any fixed mechanical design criteria, scientists focus on materials and the electrical design aspects of creating more sensitive image sensors. This represents a better way of designing new cameras and improving Sensor Sensitivity. For example, typical improvements in image sensors include replacing older wired functions with modern software or AI solutions...
As you know, Olympus and Panasonic were the first to introduce mirrorless cameras. Did they also establish the mechanical design benchmark for mirrorless cameras? For example, what is the built-in safety margin on M43 cameras? When you see similarly sized APC or FF cameras, does it mean the M43 camera is over-designed, or are these APC and FF cameras under-designed?
How much image noise is added to the noise floor for each 1-degree increase in temperature?
Try this quick experiment and point a light source at your PC. Which of these sensors is receiving more light?
If someone says one sensor captures more light than the other, then I cannot help to think, is this statement theoretically correct? I was searching for information when I found this review. I could not help asking, is this just another Undisclosed Promotion? What if the "more light" benefit was only 0.0002% while those bigger sensors were 10% less efficient? One would like to think it's all about the efficiency of the sensor when converting photons into electrons, right?
See this discussion. It's a great example of why photographers should push manufacturers for better information. Also, do a quick search on the implications of "Undisclosed Promotions"...
Final comments on the two images in this article
Take a look at the 1st image in this article. I have set the exposure for the bright areas (sky). I wanted the sky with darker shadows. At home, I did a quick test to study the visible shadow noise when I increased the shadow brightness. Editing the raw file in PhotoLab 4, it was possible to extract cleaner image details from those same shadows. Does that mean the image had enough available information in the shadows, or is it only PhotoLab doing a great job?
The above example shows the JPEG on the left and the edited raw version on the right. The image was exposed for the shadows, which oversaturated the sensor in the bright areas. It did not clip the highlights while pushing them hard. I tried different editing techniques to get the most from this "data-rich" raw file. The most pleasing result was editing the raw file with Aurora into an HDR image. Did I push the image sensor too hard, or is it OK when we push the image sensor?
The selected images demonstrate the different technical aspects discussed in this article, plus it shows it's safe to work with ISO Low on your Olympus Pen F. The same is true for ALL cameras. Don't we benefit more from working with a fully saturated sensor and resetting our final image "brightness" in Workspace? Why is there a link between the camera (Live View) and Workspace? Why sensor size and then push restrictions like don't use the extended ISOs on your M43 camera?
More about Managing your Image Sensor and ISO Amplification in Part 2...
The Olympus label on the Pen EP-7 and OM-1 signifies the end of a rich history of innovation by the Olympus Engineering team. The new OM-System OM-1 II and OM-5 (EM-5 III) introduced a new era for these cameras. All said the similarities between the EP-7 and older E-P, E-PL, and Pen F cameras are striking. I like the elegance and look of the new Pen EP-7 with its 337 grams. The lack of an EVF and the plastic camera body also introduced a future of low-cost OM-System cameras. Good IQ and low pricing will be critical differentiators for OMS cameras like the EP-7, OM-5, and OM-1 II.
I purchased my EP-7 from OM-System in 2021. Following this short introduction, I planned to spend more time with my new EP-7. More than eighteen months passed, and it's time for an update. See my comments in RED. My E-P7 was part of a special deal with an Olympus 75mm f1.8 Zuiko lens. I had this lens and only kept the Pen EP-7 because it became my "always with me" camera.
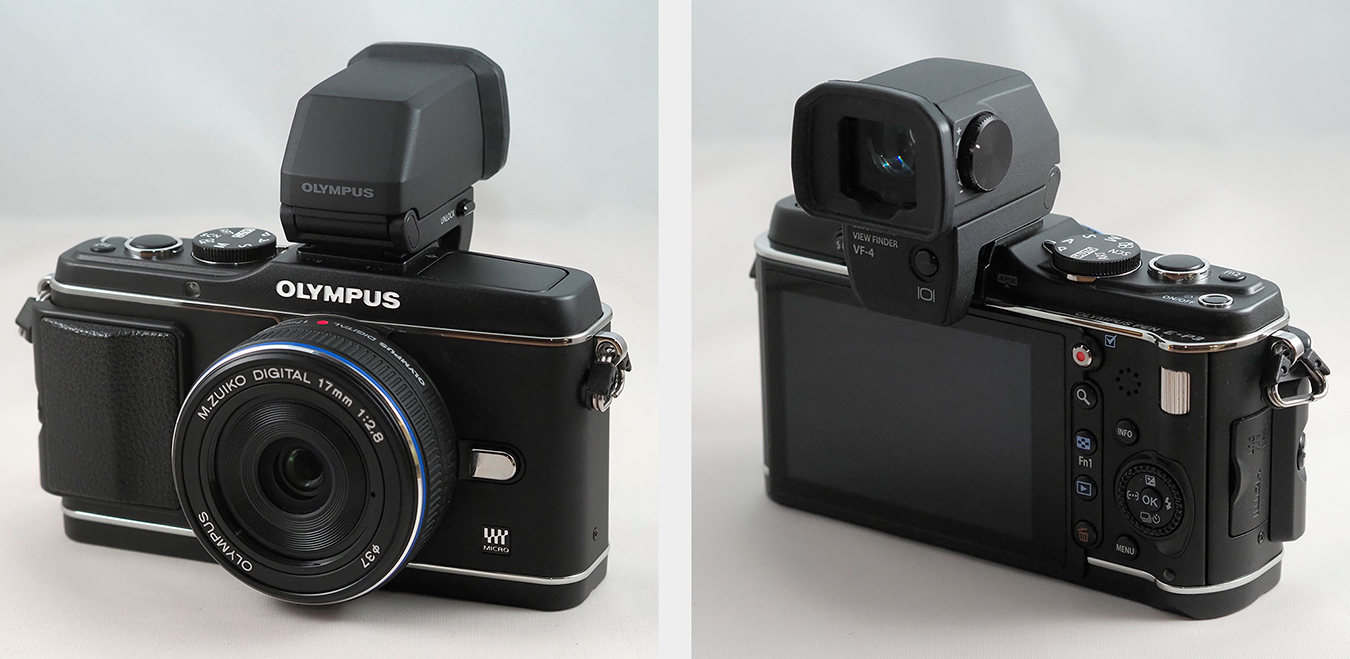
My Olympus Pen E-P7 with the M.Zuiko 17mm f1.8 lens plus the older Olympus VF-1 Optical Viewfinder.
What is new, and how does the EP-7 compare to the Pen-F
I discovered the updated User Interface (UI) with its new AP menu as I studied the Pen EP-7. The new UI is available for the EM-10 III & IV, E-PL10, and EP-7. I briefly considered renaming the title to "A New Generation of Olympus Cameras" as I learned more about this new AP-style menu.
When will we see a new Pen-F II, and will it have these EP-7 upgrades, or did the EP-7 quietly replace the older Pen-F? Did Olympus (OM-System) refocus the Pen-F by removing its OMD functionality? For many, the Olympus Pen E-P7 could easily be a perfect day-to-day or "always with me" camera.
I used my E-P7 for +18 months, and it quickly became my favorite camera. Its fewer menu options are refreshing, the controls are reachable with one hand, and the AP menu is a blast. Most pleasing is its excellent image quality. The original Photography and Color concept from Olympus included CreativeColor and unique Computational features. Does the EP-7 signal a more simplified version of this concept? Should all OM-D cameras be that different from the Pen range in the future?
The new Pen EP-7 reminds me of older Pen E-P cameras. Interestingly, the E-P1 and the EP-7 cameras are unique as they signify something new for Olympus and OM-System. For example, Olympus designed the EP-7, and OM-System launched it. Does the Pen E-P7 introduce a new design concept for OM-System? The future of the EP-7 relies on its commercial success. Like the Pen F, the new EP-7 came with a few surprises. The biggest difference is no EVF, differentiating it from the Pen F.
Olympus experimented with more cost-effective body finishes in the past. The EM5 II was the first OMD with a cheap or painted camera finish. Many used EM5 II cameras look cheap today with rubbed-off body paint. This doesn't happen to the Olympus E-P7, EM1 II/III, or EM10 II. I saw the Olympus OM-1 has the same problem. Did OM-System improve the OM-1 II? For example, I have an Olympus EM5 II Platinum version in perfect condition. I decided to never place it in my camera bag...
The Pen E-P range was always the designer range of cameras, like the above Pen E-P3 camera.
The Pen E-P2, 3, and 5 have the same auxiliary port for accessories like electronic viewfinders (EVF). The original E-P1 and the new Pen EP-7 do not have this port. The Pen EP-7 does have a tilt display like the previous Pen E-P5. The difference is that the EP-7 display tilts downwards to 180 degrees. This is a feature that Vloggers and Social Media presenters want. Is the E-P7 a Vlogger camera?
Pen E-P7 with the 17mm f1.8 lens - ISO200, f4.0, 1/400 - Monochrome in camera and Enhanced Raw edited in WS.
I didn't plan to discuss the benefits of an EVF and the E-P7. While it's a great feature, I don't need my EVF each time I use my Pen F. The main reason is that mirrorless cameras are different from DSLRs, and modern camera displays are excellent. The biggest problem is bright or midday sunlight. I would have liked the same EVF option on the E-P7 as older Olympus mirrorless cameras like the E-P3...
The 25% of the time I benefit from having an EVF will also be a dealbreaker. Bright sunlight, Live View, and fine-tuning my creative settings are best done with an Electronic View Finder (EVF).
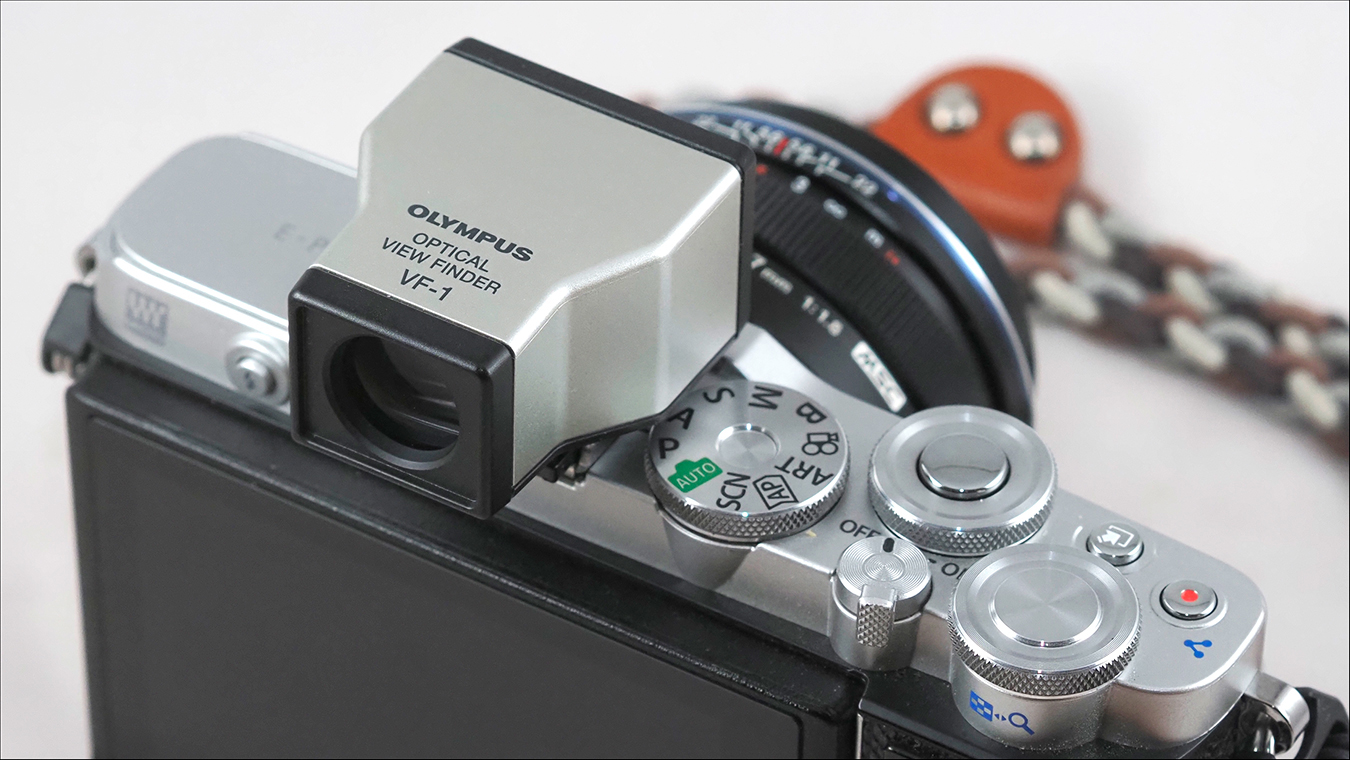
The old VF-1 from Olympus is an excellent OVF in combination with the 17mm f1.8 lens.
September 4th, 2023 update:- The POV Photo Guy, another YouTube reviewer, said the Pen E-P7's IQ and colors are exceptional in this review. I agree with him because my Pen-F and the E-P7 have excellent color and image quality. For example, see this short article about the EP-7.
Also, see this article about ART filters and color profiles.
The most exciting part of Workspace is reviewing and tweaking your camera settings, and the ability to produce Olympus image quality and colors with Workspace. For example, Workspace does not change your OM-D's professional or the Pen-F or E-P7's creative image look. Olympus photographers can now get Olympus image quality and colors from their home PCs and Workspace. For example, raw images from older compact cameras like the XZ-2 or the Olympus E-620 DSLR are the same as the camera when converted with Workspace. The exported 16-bit TIFF files from Workspace also provide cleaner and better image data to Photoshop when editing your images.
The Pen-F's Color and Monochrome Profile functions were added to the new E-P7. You will also see functions like the Color Creator, Highlights & Shadows, ART filters, and many more in the E-P7. The Pen E-P7 makes one wonder if OMDS targeted the E-P series for its simplicity and elegance.
The implementation of the E-P7 Color and Chrome functions is unique. Many photographers battled with the Pen-F when using it irregularly. The E-P7 is more user-friendly with its new Color/Mono lever, updated UI, and new AP Menu. My favorite applications with the E-P7 are Monochrome and Color profiles. I never created monochrome profiles because the Pen F and E-P7 give us excellent control while photographing. One can always fine-tune your monochrome settings in WS.
Pen E-P7 with the 17mm f1.8 lens - ISO200, f4.0, 1/640 - Monochrome in camera and Enhanced Raw edited in WS.
It's good that OMDS decided to continue with the Enhanced Raw Format and the benefits of Live View in WorkSpace. The difference Workspace makes is significant. All OMS photographers should be able to view honest social media discussions and enjoy a fair chance to experience Workspace.
The E-P7 is compatible with my Pen-F color and monochrome profiles. I created a few color profiles for the Pen F. They are fully compatible with the new E-P7 and other Olympus cameras.
Do we learn anything new about future OMDS cameras from the E-P7? We are lucky because we now have the OM-5 and the OM-1. You can also find my OM-1 MKI/II comments on this blog. Below is an updated list of what these cameras teach us about future OM-System cameras:-
The Pen E-P range is a designer or elegant street, and a creative camera...
The OMD E-M10 series is for the enthusiast and entry-level OMD photographer
The OMD OM-5 series for the demanding outdoor and hiking photographer
The NEW OM-1 series for the serious hobby and professional photographer
The OMD EM1X - based on the EM1X popularity, will there be an EM1X?
What do you think the next OMD will be like?Well, we have the new OM-1. We saw the IQ benefits of the new stacked BSI sensor in my OM-1 review. We also know the 20MP Live MOS sensor performs well in the EM1 II & III and cameras like the new E-P7 and the Pen-F. It would be interesting to see if OM-System reuses the new BSI sensor like Olympus did with its previous sensors.
There is simply NOTHING like the Pen F on the market today...
Does the E-P7 have a similar 20MP Live MOS sensor as the Pen-F? It doesn't seem like the same sensor because the E-P7's continuous autofocus capability is better in video mode. The E-P7 has the same TruePic VIII processor as the EM1 II, EM5 III, and the OMD EM10 III & IV.
For more about the TruePic VIII Image Processor in the E-P7, see the E-PL10 description at OM-System and how the TruePic VIII prevents image noise. The Pen F, the EM5 II, and the EM10 II all use the previous TruePic VII image processor.
Consider the complete offer when searching for a new camera. Image Processors are part of having better cameras with higher image quality. The 4 most important aspects to consider when searching for a new or secondhand Olympus are:
The camera - Truepic image processor version and firmware upgrade history
The image sensor - study the camera launch papers to see what they improved
The type of photography and which of the Premium or Pro lenses you need
Workspace - this is the most neglected and most critical Olympus editing option
A good example is the different EM10 models. Considering the EM10 MKII or MKIII, which is more relevant for 2024? The EM10 II is known for being an excellent camera, while the EM10 III updates offer more in terms of 4K, better AF, the new AP menu, and the newer Truepix III processor.
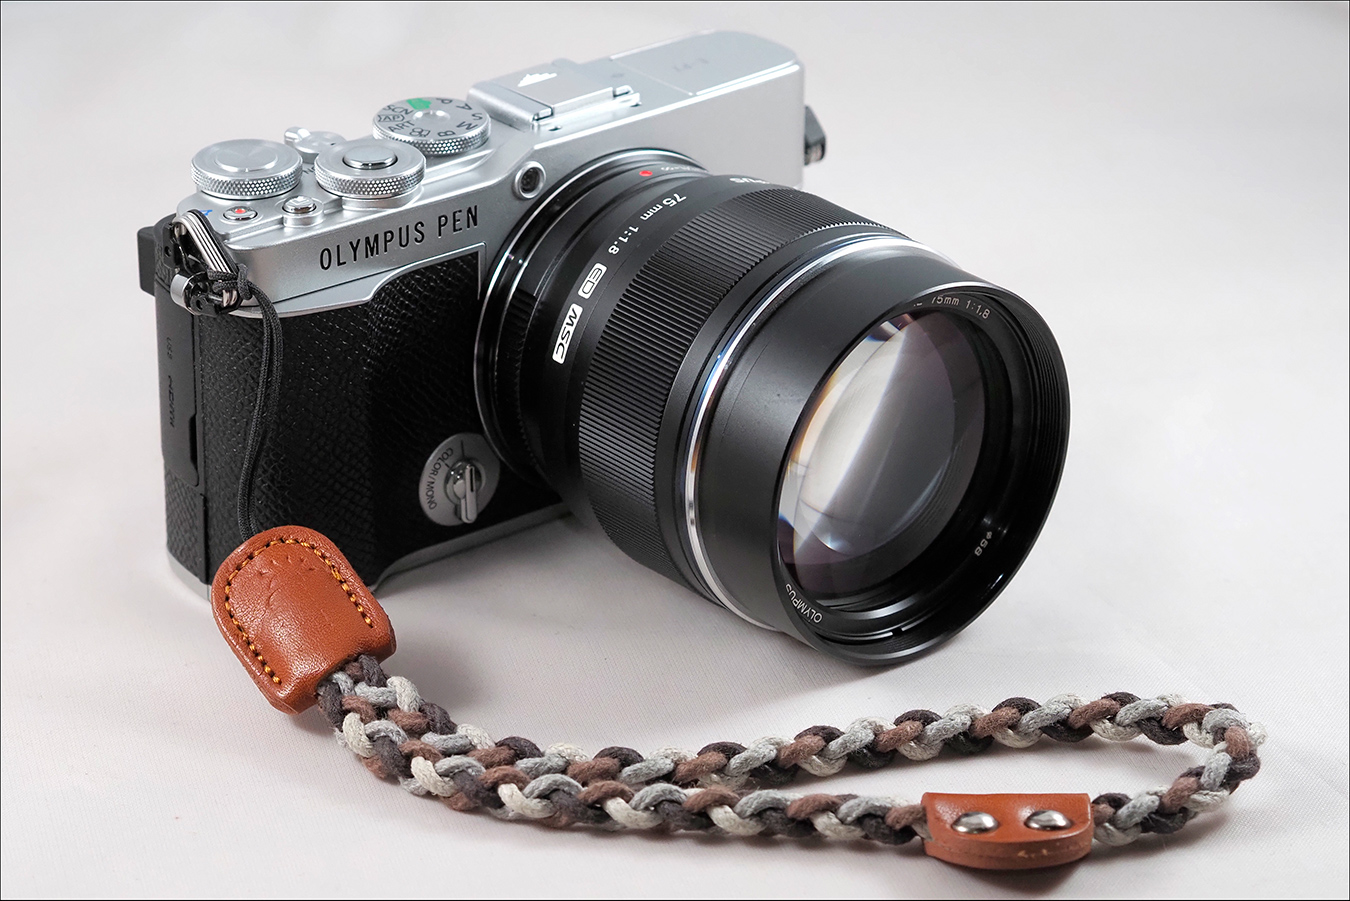
The Olympus Pen E-P7 with the 75mm f1.8 lens. The 75mm lens makes for a fantastic combo with good image quality.
I knew the E-P7 would produce excellent image quality. Each time I use one of my OMDs or go back to the Pen-F, I am surprised by the image quality of these Pen cameras. The obvious question is, did the new Pen E-P7 follow in these footsteps, or will we see a more neutral or Pro-like image quality from the E-P7? What is your preference?
I am happy to report that the Pen EP-7 became my favorite "always with me" camera. It is quick and responsive, the VF-1 optical viewfinder is a joy with 17mm lenses, and the image quality from the Pen E-P7 is the best I have seen from any of the Olympus Pen cameras. It is also a fun camera when walking or doing street photography.The new E-P7 is simply an exceptional camera.
The Olympus R&D engineers simplified the E-P7 menu. The simplicity of the E-P7 menu is excellent, especially when you need to find or adjust a function. The new SCP and AP menus improved the E-P7 user experience and operation. Folks, the new E-P7 is a very different mirrorless camera...
Olympus E-P7 with 75mm f1.8 lens - ISO250, f2.0, 1/160 - Enhanced Raw Edited in WS.
I can only recommend the new ART filters and SCN modes of the E-P7. The ability to tweak your ART filters is a game changer, and new SCN modes like the HDR option are excellent. My first reaction was disappointment when I opened the "mini" menu of the Pen E-P7. The E-P7's secret is its new AP user interface, ART filters, SCN modes, Color Creator, and color and monochrome profiles.
The E-P7 partners well with the Enhanced Raw Format and Workspace. I have been enjoying great results with the previous and the most recent versions of Workspace. See my Workspace firmware updates. Workspace is currently the best raw converter for your Enhanced Raw Files, and Photoshop is the best editing option for editing your exported Workspace 16-bit TIFF files.
It was clear that the Pen E-P7 is compatible with my Pen-F color and monochrome profiles after trying them with my Pen E-P7 and the E-P7 enhanced raw files. Study this article for more information about the Enhanced Raw Format and Workspace. The image above shows the new "Color" slider for ART filters. The color slider is available for both the E-P7 and Workspace. The video below explains how to use Workspace and the Enhanced Raw Format to replicate the camera's image signal path.
It's now possible to change the effect or how much the ART filter changes the image. This makes the E-P7 a more exciting option for ART filters. One of the most powerful aspects of the new Pen E-P7 is the ability to replicate and tweak your camera settings in WS. Olympus is the only manufacturer with this level of Enhanced Raw control of the camera's ART Processor and Workspace.
I tweaked the E-P7 Instant Film ART filter in Photoshop. See a description of the technique below...
I use a similar technique as the new ART filter slider to tweak my ART filters in Photoshop. I start by converting two copies of the raw file in WS, one with the ART filter and another in the iEnhanced Picture Mode. I will open both in Photoshop layers with the ART filter image on top of the iEnhance image. I then use the Opacity Slider in layers to adjust the final ART effect.
Pen E-P7 with the 17mm f1.8 lens - ISO200, f4.0, 1/640 - Monochrome in camera and Enhanced Raw edited in WS.
I enjoyed my E-P7 enough to keep it after having it for more than one year. Things like not having an EVF are frustrating. If this puts you off, then the E-P7 is not a camera for you.
Let's compare a few interesting E-P7 differences to the Pen-F:- (Updated)
The E-P7 has 4K with 120fps @ 720p and the Pen-F, 1080p and 120fps @ SD
The E-P7 video format is MPEG, and it has no ALL-I or MOV like the Pen-F
The E-P7 body is plastic and light, and IBIS is half a stop slower than the Pen-F
The maximum sequential shutter speed for the E-P7 is slower than the Pen-F
The Pen-F High-Resolution mode was not transferred to the new Pen E-P7
The 4 Custom Modes on the Pen-F Mode Dial are not on the E-P7 (Use the SCP)
To simplify the E-P7, many of the Pen-F's external controls were removed
The exposure comp dial on the Pen-F is not on the E-P7 - it's like the OMDs
This simplification (No Creative Dial but UI) makes for a new E-P7 experience
A new Instant Film ART filter was added, while the filter options UI is better
The opacity of some of the ART filters is now adjustable - this is a good option!
The Pen-F built-in EVF (with OVF) is not available with the new E-P7...
Can now charge the battery via USB. We older guys simply use 2 batteries
The Pen E-P7 user manual has been reworked and is easier to read/study...
New AP Button activating the "creative" menus (AP, SCN, Live Guide...)
The E-P7 new B-Mode - long exposures and light blending - user experience!
OMDS added new SCN Modes to the E-P7 - it's part of the user experience!
The panorama mode on the E-P7 also changed/improved, which is interesting.
The filter/profile effects in movie mode are improved - need to be explored...
The focus is on everyday photography. It's small enough to always be with you...
I tried the 1st iteration of the "new user experience" or AP menu on my wife's EM10 III. I prefer the familiarity of my EM1 II and Pen-F. I can see the value of having a more "user-friendly interface." A simple example is selecting Live Bulb and Live Comp on the Pen-F. Many would say it's logical to turn the shutter dial to "B." While this is normal for older photographers, it might not be for young photographers. See the EM5 III implementation of the new user interface.
A little more than one year, and my opinion changed. The new UI is simple, effective, and great to work with as you get to know it. This new UI is a great selling point for the E-P7...
Olympus Pen-F with the 8-18mm f4.0 lens - ISO200, f6.3, 1/1000 (Raw file converted in PhotoLab 4 & edited in PS)
Why do I regard the Pen-F as a more hands-on camera than the E-P7? The Pen-F and the photographer are like a team. Every dial and knob are intuitively placed and easy to reach as the photographer selects the image angle, framing, and final tweaks of the image look or enhanced raw file. Olympus focused on photography and not the camera. The EVF placement, touch focus, exposure compensation dial, and creative dial are active parts of creative photography. Using the Pen-F is a continuous process of tweaking and evaluating until one presses the shutter. For example, one of the most underestimated features of the Pen F is its features and the optional handgrip...
This is the Olympus version of the above image when the Enhanced Raw Files are converted in WS.
The new Pen E-P7 is more like the previous Pen E-PL10 series and not the Pen-F. The new UI and the touchscreen were implemented to target a specific segment and user profile. One can also see how Olympus preferred the simplicity of the older Pen E-PL cameras. Did they add the Pen-F profile functionality to the EP-7 because the target segment wanted this functionality?
I did change my mind after one year with the E-P7. My previous description of the Pen-F is correct because it has the minimum creativity every camera should have. What makes the E-P7 more like the Pen-F is its two control dials. The E-P7 feels like an OMD or the Pen-F in the hand. I need my left hand to switch on the Pen F. With the E-P7, everything is controlled with one hand...
The new Pen E-P7 is perfect for short video clips...
Short E-P7 with 12-50mm EZ lens video was edited in iMovie. I also added its music.
While I am not an experienced videographer, these 2 videos were interesting. You will see that the video quality of the 1st clip could be better. I checked all my original clips, hoping the problem was Google or the video editing software. Looks like the problem is me and not the equipment I used...😀
I also experimented with different recording formats, lenses, exposures, and Variable ND filters. My results continue to improve at 1080p and 4 K. The E-P7 was obviously not designed to compete with cameras like the GH5. The Pen E-P7 should be on your list of possible cameras if you are searching for a new "compact" style camera. The more I use the E-P7, the better it gets... 😊
The video I did in iMovie is better.
I did more tests with good colors and detail in 1080p and 4 K. The secret is to free up the Image Processor. The best way to free up the image processor is to select fewer adjustments in the camera. I used the following settings to record my video clips:
1080p, Super Fine (bitrate), 25 bps, and MOV (auto-selected)
My Picture Mode was set to Natural (to free up the processor)
I used Exposure Mode S or Shutter Priority (not Movie Mode)
The camera uses C-AF in video mode - Use all the focus points
The ISO Auto range is 200 - 3200 with No Exposure Shift
Tone Curves Function was set to +1 (highs) and -1 (lows)
Shutter Speed was set to 1/50th and ISO to Auto
I never adjust any of the other variables, like sharpness
I used the 12-45mm f4 Pro lens with a Variable ND filter
The type of memory card is critical. I use a V30-rated SD card.
Olympus E-P7 with the 12-50mm EZ Lens.
Does everyone need 4K, or is 1080p good enough? It sounds good if 4K records 4 times as many pixels as standard HD (1080p). The reason I prefer 1080p is the recorded data and quality. For example, a good balance between data and video quality is 1080p @ 25fps. Any increase, like 1080p @ 50fps or 4K, means more data and processing power. The requirements for recording good video quality are similar to taking photos. Regular practice and appropriate camera settings, and lenses are essential.
One of the E-P7 improvements is its CAF performance. I couldn't find much info about the autofocus algorithm, except for noticing an improvement in the E-P7's continuous autofocus performance. It also performs differently from my older Pen F and the EM-5 II cameras. OM-System only mentioned better Face Detection and an improved Contrast Detect AF algorithm for the E-P7.
The new AP Menu and design of the Pen E-P7
The image below shows the similarities between the new E-P7 and other Pen models. The thought that we will not have a Pen-F II is disappointing. Is the Pen F too old to rebrand it as an OM-System Pen F II? Did OM-System decide to move on, knowing that M43 photographers rejected the Pen F? We also saw the launch of a new Fuji X100VI supporting Fuji's interest in this niche market?
I often asked myself, what if photographers were a little more adventurous and accepted the Pen-F? Will this "failed" Pen-F experiment be the final push of the creative ART and color boundaries?
One of the differences between the E-P7 and the older Pen F is functionality. Most M43 photographers felt intimidated by the Pen-F's creative dial and function lever. OMDS improved the EP-7's creative modes significantly. The creative dial was replaced with a lever, and the new AP menu replaced the Pen-F's function lever. Olympus also cleaned up the creative menus of the E-P7.
The new Olympus E-P7.
It takes a little getting used to, but it was fun once I familiarized myself with the new menu system. The main strength of the Pen E-P7 is the new UI and the E-P7's one-handed operation. Everything can be done with one hand. The knobs and dials are all within easy reach and logically placed.
The new Olympus E-P7.
My articles about color and the Olympus Pen F are as popular as when I first wrote them. The E-P7 is a great addition to the Pen Range because it is the same as what made the Pen-F so special. The longer you use the E-P7, the more you realize it's an exciting new creative solution...
OM-System also launched a new version of the OI Share Application. I tried the new App with the EP-7, and they work well together. The remote control function seems better, especially with LiveComp and Live-Time. Image editing is better with the App and now has Dehaze and Clarity like Workspace. The similarities between the IO Share Application and Workspace are interesting. I also liked the updated options for sharing images on the web. OM-System, why not give us more image ratios like the 5:4 ratio in the camera? You will learn more about the new OI. Share here.
The E-P7 with Color Profiles and Workspace
Below is an example of a Color Profile I did for the Pen-F. This profile is unique because it was designed to edit or prepare the image in the camera. This profile can also be used to color-grade videos while recording your clips. This is now also possible with the Pen E-P7. (I tried it on with my E-P7) See this Page for more on this "1020" color profile...
Olympus Pen-F with 11-year-old 8-18mm f4.0 lens - ISO200, f6.3, 1/1000 (Raw file converted & edited in Photoshop).
This is the Olympus version of the above image when the Enhanced Raw Files are converted in Workspace.
Conclusion
My original idea was a detailed comparison between the Pen-F and the E-P7, but after studying the E-P7, it was clear these are two very different cameras. The Pen-F will always be the first creative camera with a special connection to Pro OMD cameras. The more simplified E-P7 is a more basic version of the Pen-F. The good news is the Pen E-P series continues with the creative flair of the Pen F. Interestingly, the Pen-F popularity continues to increase each month...
We also saw something encouraging from OMDS. They are pushing the complete Zuiko lens offer. Lenses like Basic Zuiko and Premium Zuiko lenses enjoy the same visibility as the Zuiko Pro range. For example, see the EM5 III or the E-M10 IV page if you can find it on OM System's website. This is good news because Premium Zuiko lenses, like the f1.8 compact range, are fantastic.
Three images were taken with the E-P7 and one with the EM-1 III, which is the EM-1?
I saw no major surprises with the new E-P7. It's basically a good and well-balanced camera. Though very different from the Pen-F, we now have 4 color and 4 monochrome profiles in the E-P7. That said, I find it easier to do color or monochrome settings on the go and to only tweak them in Workspace.
It will be a sad mistake if Olympus photographers underestimate the Pen E-P7 as they did with the Pen-F. For example, one can expect a new EM10 IV or a Pen E-P7 II because we now have a clear cut between OMD and Pen E-P cameras. We did get the EM10 IV..!
The Color Creator is one of the more underrated functions from Olympus. The article was written to give M43 photographers a new perspective on this unique function. The Color Creator multitasks as an innovative tool to adjust the color and ambiance of our photos while teaching us more about color and creative techniques. For example, the Enhanced Raw Format makes it possible to use the Color Creator in the field and keep or deselect the results in Workspace.
The Color Creator and Color Adjust tools are unique to Olympus and give us a broader range of color and creative options. I appreciated the uniqueness of these features more when I saw how much Fuji photographers do with fewer options. The Color Creator reminds me of Fuji's chrome effect.
Try the following exercise with your Color Creator.
Select a similar image from your image collection to create the above color and ambiance for your photos. Raw files work better because the Color Creator is unavailable for JPEGs. Open the raw file in Workspace and select the Color Creator from the Picture Mode menu. The Color Creator was available for all 16MP and 20MP (OM-D and PEN) Olympus cameras.
Start by identifying the colors in your image as you open the image. Use the Adjust Color function to find the colors. Move the mouse over the image and follow the highlighted colors on the color sliders (below). The colors below the mouse pointer will be highlighted on the color sliders.
I identified yellow and blue with the above method and targeted yellow in the above photo. Be aware of unnecessary color casts with colors not found in the photo. That said, the Color Creator is good for removing color casts. Photographers might also prefer special color effects. For example, most images benefit from warm colors. I like to start with orange to evaluate my photos.
This is an example of using blue (the opposite of yellow)
A brief explanation of the Olympus Color Creator
The Color Creator is my go-to function for creative color effects, and I prefer the Adjust Color tool for Color Profiles. The conditions for the above image were a late afternoon sundown scene. It's good to practice selecting the best time of day and photo opportunities (painting with light) for the Color Creator. The next step in the above example was targeting blue with the Color Creator.
The above illustration shows the Color Creator (CC) to the right and the Color Wheel (left). The colors in the Color Wheel mimic the colors in the Color Creator. The primary colors are RGB in the Color Wheel. It helps to keep a copy of the color wheel in your pocket or on your phone.
A basic explanation of how the Color Creator works.
Summary notes for the Color Creator (CC):-
Always divide the CC into halves, the Color Pointer half and opposite colors.
Start adjusting the targeted colors (color pointer) and next the opposite colors.
The vivid "slider" changes color while the opposite side desaturates the colors.
The image changes to B&W (desaturate) when the vivid slider is in the center.
Except for the B&W images, the colors to the left/right are impacted the least.
Pen-F with the 17mm f1.8 - ISO200, f5.0, 1/1000 - Color Creator (11:0) - Opposite colors with desaturated greens.
The Color Creator is good for creating positive reactions from your audience. Regular practice and hands-on experience are essential for having good results with the Color Creator. This video talks about color harmonies and how they can be used to change the audience's mood.
You can tweak your Color Creator settings in Workspace with the Enhanced Raw File. Activate the Color Creator in WorkSpace and see the color settings you used in the field. See my article on the Enhanced Raw Format and how to activate your camera settings in Workspace.
Example 1 (Workspace, Color Creator, and layers in Photoshop)
I targeted orange/red to simulate an analog film look with Workspace
I used the Color Creator and Color Filters at the same time in Workspace
I exported the image to Photoshop and applied Soft Blending in Layers
Olympus Pen F with 9-18mm f4-5.6 lens, ISO200, 1/1250, f5.6
Example 2
Color Creator, Highlights/Shadows, Tone Curves, and PS
I targeted magenta with +1 Vivid in the Color Creator
I used the Soft ART filter to create a specific ambiance
I used layers and blending modes to add a little definition
See my main Workspace adjustments below the image
Olympus EM1 II with 35-100m f2.8 Lumix - ISO200, f2.8, 1/800
Example 3
Pop ART Filter, Color Creator, and Color Filters
See my Workspace settings below the image
I used Photoshop and Blending Modes
Olympus Pen F with 12mm f2.0 Lens - ISO800, f4.5, 1/80
Example 4
This is an example of editing two Enhanced Raw Files with Workspace. How does one target colors in Workspace? Start by identifying the colors and their opposite colors in the image. Focus on them and use the Color Creator to create color and ambiance effects. Use the Tone Curves function in Workspace as a curves function or complementary colors to the Color Creator. A third level of augmenting the Color Creator is Workspace Presets. All these benefits from gaining more experience...
The two examples below demonstrate the power of the Color Creator.
The first raw image
The second raw image
The above example is interesting because I purposely increased the vividness to highlight the colors in the scene. I do not typically saturate colors this much. I had to adjust the sky because the Color Creator desaturated the blues (the opposite color). I used my "WB Preset" to correct the blues. This technique of combining two functions makes Workspace more interesting.
Example 5
This example uses multiple filters in Workspace
Practice with opposite colors and color harmonies
I started with the Instant Film ART Filter because I wanted a film look
I used opposite colors and color harmonies with my different filter settings
See my editing steps and the different filters I used in WS for this image
What do we learn from the above examples?
Work with colors found in the scene or the image
It's good to use harmonizing colors - See this article
The concept of working with opposite colors is key
Practice using multiple color functions in Workspace
Additional editing steps:-
I adjusted my final contrast with the highlights/shadows (curves) function.
ART Filters work great with the Color Creator and Highlights/Shadows
I use the Unmask Filter in Workspace or Smart Sharpen in Photoshop
I often do my final brightness, contrast, and cropping in Photoshop
The Color Creator is a creative tool. Use it as often as possible in the field. Also, practice with the Color Creator in WorkSpace, and try the Color Creator with WB (Preset) combinations.
Additional information:-
For more about Enhanced Raw Files and Live View, link
Editing images in Live View mode with WorkSpace - link
Go to the WorkSpace Tips article for several tips - the link
Olympus Pen F with 25mm f1.8 Lens - ISO200, f4.5, 1/500 (only i-Enhance)
There is a general misunderstanding about iEnhance in Picture Mode. Search for more information if you haven't. Olympus added its most advanced imaging technologies to the iEnhanced Picture Mode. It has three intensity levels with instantaneous benefits for your camera and Workspace.
Olympus Pen F w 25mm f1.8 Lens - ISO200, f4.0, 1/1000 (CC 19:0, EC=-2, Saturation +0.4, Curves 2:-1:-1)
Olympus Pen F w 25mm f1.8 Lens - ISO200, f4.5, 1/500 (CC 3:0, Curves 2:-0:-2)
Olympus Pen F w 17mm f1.8 Lens - ISO200, f5.6, 1/640 (WB Shadows & A-3, CC 3:0, Curves -4:-3:0)
Olympus Pen F with 75-300mm Lens - ISO200, f6.7, 1/400 (Raw edited with PhotoLab 4 & PS)