History: Canon and Nikon thought DSLRs are future proof when Olympus introduced the E-M1 in 2013. It took them years to catch up...
Showing posts with label Creative Color Series. Show all posts

Apr 11, 2023

A few casual photos from my Olympus Pen EP-7

 Last Updated:- 14th April 2023

Everything changed as I uncovered more technical information about digital cameras. I spent months searching and studying credible information about cameras. Did my image quality benefit from this learning curve? For example, how much does a new camera or fine-tuning my exposure with the SNR to ISO ratio improve my results for 2023? My first reaction is not much. The correct answer is not a fixed improvement because most image quality improvements vary from case to case.


Pen EP-7 with 75mm f1.8 - ISO250, f2.0, 1/160 - Raw edited with WS - Pop ART filter adjusted + soft focus. 


We also need to consider the technical aspects of image quality. A basic description of image quality should always include things like shadow, midrange, and highlight data. The next step is optical variables like DOF, focusing, and composition. Most cameras capture good tonal data in the midrange and highlight areas. A common challenge is capturing good shadow data.

You will find my overview/review of the Pen EP-7 here.


This is the most exciting configuration for the Olympus PEN EP-7. The 17mm f2.8 lens is fantastic...


The critical part of studying digital cameras is finding creditable info while staying focused on the fun part of digital photography, image editing, and the camera. For example, always keep a camera with you? It's a simple measure of having a healthy passion for photography. It's sometimes difficult, but people appreciate discretion, and nothing is as rewarding as sharing your results.

The Olympus PEN EP-7 captures good shadow details and is small enough to always keep with you. I like the above configuration with the 17mm f2.8 or f1.8 Zuiko lenses and the Olympus Optical Viewfinder. The Zuiko 17mm f2.8 lens oozes creativity and is almost always on my Pen EP-7. I have an older black/gray Olympus shoulder bag for my Olympus Pen F or EP-7. The 17mm f2.8 is also one of a few M43 lenses that are excellent for recording 3D-looking images.

Many photographers like a "3D look" or a sense of depth in their images? How does one create this 3D look? With the lens, composition, background blur, leading lines, or shadows?


The combination between Workspace, the Enhanced Raw Format, and Olympus cameras benefit the look and feel of our final images. It also improves the photographer's creative process while editing with WS or photographing the "edited" version of the photo with the camera. Practice these skills in the camera and Workspace. This process should be an integral part of your photography.

The EP-7 has just enough features to stay focussed on photography. How many knew 90% of the Pen F or EP-7 and Workspace settings are the same? For example, the highlights and shadows function is part of the camera's exposure calculation. Neutral gray changes as we set the highlights, shadows, or exposure compensation. We can adjust or correct this in the camera or Workspace.

For more about Workspace and the Enhanced Raw Format, study this article.

How many of you saw the ART filter upgrades in Workspace or some of the newer Olympus cameras, like the EP-7? They are great for tweaking these final ART filter effects. Target primary or secondary colors or any opposite combinations in the scene. See the examples below and study this link.


Olympus Pen EP-7 with 17mm f2.8 lens - ISO200, f6.3, 1/200 - Raw edited in WS - Color Creator 9:0.


EP-7 with 12-50mm f3.5-6.3 - ISO200, f6.3, 1/60 - DxO PhotoPack Generic Fuji Provia filter.


Olympus EP-7 w 17mm f2.8 lens - ISO400, f5.6, 1/80 - Raw edited in WS - Partial Color ART Filter


The above image is an interesting example. I used the Partial Color ART filter twice and combined the 2 results in Photoshop. I applied the Soft Focus Effect in the ART filter and adjusted the intensity with the Clarity and Dehaze sliders. I used a Color Filter in Workspace and duplicated the background layer in Photoshop to add a Soft Light Blending effect. It is possible to edit or adjust the intensity of each step. I used DxO FilmPack to select a frame for the image.


Pen EP-7 w 17mm f2.8 lens - ISO250, f6.3, 1/200 - Raw edited in WS - Instant Film ART Filter w Soft Focus.


Olympus Pen EP-7 with 17mm f2.8 lens - ISO200, f6.3, 1/400 - Raw edited in WS - MonoChrome Profile.


Pen EP-7 w 17mm f2.8 lens - ISO200, f6.3, 1/250 - Raw edited in Workspace - 1020 Color Profile.


Olympus Pen EP-7 with 17mm f2.8 lens - ISO60, f6.3, 1/200 - Raw edited in WS - My own FujiFilm Velvia 100 Color Profile.


Pen EP-7 with 17mm f2.8 lens - ISO200, f6.3, 1/1000 - Raw edited in WS - MonoChrome Profile + Color Filter.


Olympus Pen EP-7 with 17mm f2.8 lens - ISO200, f6.3, 1/200 - Raw edited in WS - Instant Film ART Filter.


Olympus Pen EP-7 with 17mm f2.8 lens - ISO200, f6.3, 1/200 - Raw edited in WS - Instant Film ART Filter.


Olympus Pen EP-7 with 17mm f2.8 lens - ISO200, f6.3, 1/320 - Raw edited in WS - Pop ART Filter w Soft Focus. (Nice 3D Look)


Pen EP-7 with 17mm f2.8 lens - ISO200, f6.3, 1/200 - Raw edited in WS - Grainy Film ART Filter.


Olympus Pen EP-7 with 17mm f2.8 lens - ISO200, f6.3, 1/200 - Raw edited in WS - Color Creator 2:-1 - DXO PhotoPack Frame.


Pen EP-7 with 17mm f2.8 lens - ISO200, f6.3, 1/200 - Raw edited in WS - Diorama ART Filter.


This image was taken in South Africa. The EP-7 is a great little camera...


Apr 21, 2021

How to use the Color Creator?

Last Updated:- 3rd February 2023.

The Color Creator is one of the more underrated functions from Olympus. The article was written to give M43 photographers a new perspective on this unique function. The Color Creator multitasks as an innovative tool to adjust the color and ambiance of our photos while teaching us more about color and creative techniques. For example, the Enhanced Raw Format makes it possible to use the Color Creator in the field and keep or deselect it in Workspace.

The Color Creator and Color Adjust tools are unique to Olympus and give us a broader range of color and creative options. I appreciated the uniqueness of these features when I realized how much Fuji photographers do with less. More about this in a future article.


Try the following exercise with your Color Creator.


Select a similar image from your collection and recreate the above color and ambiance for your photo. Use a raw image because the Color Creator is unavailable for jpegs. Open the raw file in Workspace and select the Color Creator from the Picture Mode menu. The Color Creator was available for all 16MP and 20MP (OM-D and PEN) cameras from Olympus.

Start by identifying the colors in your image when it's your first time. Use the Adjust Color function to find the colors. Move the mouse over the image and follow the highlighted colors on the color sliders (below). The colors below the mouse pointer will be highlighted on the color sliders.


I found yellow and blue with the above method and selected yellow for the opening example. Be aware of creating color casts with colors not found in the photo. That said, the Color Creator is good for removing color casts. Photographers might also prefer specific color effects.


This is an example of using blue (the opposite of yellow)

A brief explanation of the Olympus Color Creator


The Color Creator is my go-to function for color creations, and I prefer the Adjust Color tool for Color Grading or Profiles. The conditions for the above image were a late afternoon sundown scene. It's good to practice selecting the best time of day and photo opportunities for the Color Creator. The next step in the above example was to "create" orange with the Color Creator.


The above illustration shows the Color Creator (CC) to the right and the Color Wheel (left). The colors in the Color Wheel mimic the colors in the Color Creator. The primary colors are RGB in the Color Wheel. It helps to keep a copy of the color wheel on your phone.


A basic explanation of how the Color Creator works.


Summary notes for the Color Creator (CC):-
  • Always divide the CC into 2 halves, the Color Pointer half and opposite colors.
  • Focus on the colors below and opposite the color pointer when turning it.
  • The vivid "slider" creates color while the opposite side desaturates the colors.
  • The image changes to B&W (desaturate) when the vivid slider is in the center.
  • Except for the B&W cases, the colors to the left/right are impacted the least.

Pen-F with the 17mm f1.8 - ISO200, f5.0, 1/1000 - Color Creator (11:0) - Opposite colors with the greens desaturated.

The Color Creator is good for creating positive reactions from your audience. Regular practice and hands-on experience are essential for having good results with the Color Creator. This video talks about color harmonies and how they are used to change the mood of the audience.

We can change the Color Creator settings with the Enhanced Raw Format. Activate the Color Creator in WorkSpace to see the color effects you created in the field? See my article on the Enhanced Raw Format and how to activate your camera settings in Workspace.

Example 1 (Workspace, Color Creator, and layers in Photoshop)
  • I targetted orange/red to simulate an analog film look with Workspace
  • I use the Color Creator and Color Filters at the same time in Workspace
  • I exported the image to Photoshop and applied Soft Blending in Layers

Olympus Pen F with 9-18mm f4-5.6 lens, ISO200, 1/1250, f5.6

Example 2 
  • Color Creator, Highlights/Shadows, Tone Curves, and PS
  • I targetted magenta with +1 Vivid in the Color Creator
  • I used a Soft Look ART filter to create the soft ambiance
  • I used layers and blending modes to add a little definition
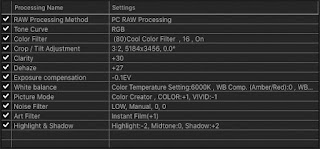
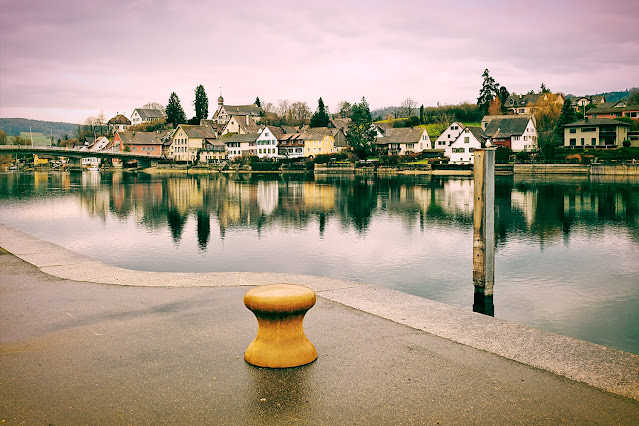
  • See my main Workspace adjustments below the image

Olympus EM1 II with 35-100m f2.8 Lumix - ISO200, f2.8, 1/800


Example 3 
  • Pop ART Filter, Color Creator, and Color Filters
  • See my Workspace settings below the image
  • I used photoshop and Blending Modes


Olympus Pen F with 12mm f2.0 Lens - ISO800, f4.5, 1/80


Example 4 

This is an example of editing two Enhanced Raw Files with Workspace. How does one target colors in Workspace? Start by identifying the colors and opposite colors in the image. Focus on them and use the Color Creator to create color and ambiance effects. Use the Tone Curves function in Workspace as a curves function or complimentary colors to the Color Creator. A third level of augmenting the Color Creator is the WB Presets. All these benefits from gaining more experience...

The two examples below demonstrate the power of the Color Creator.

The first raw image


The second raw image


The above example is interesting because I purposely increased the vividness to highlight the colors in the scene. I do not typically saturate colors this much. I had to adjust the sky because the Color Creator desaturated the blues (the opposite color). I used my "WB Preset" to correct the blues. This technique of combining two functions makes Workspace more interesting.

Example 5

  • This example uses multiple filters in Workspace
  • Practice with opposite colors and color harmonies
  • I started with the Instant Film ART Filter because I wanted a film look
  • I used opposite colors and color harmonies with my different filter settings
  • See my editing steps and the different filters I used in WS for this image


What do we learn from the above examples? 
  • Work with colors found in the scene or the image
  • It's good to use harmonizing colors - See this article
  • The concept of working with opposite colors is key
  • Practice using multiple color functions in Workspace

Additional editing steps:- 
  • I adjusted my final contrast with the highlights/shadows (curves) function.
  • ART Filters work great with the Color Creator and Highlights/Shadows
  • I use the Unmask Filter in Workspace or Smart Sharpen in Photoshop
  • I often do my final brightness, contrast, and cropping in Photoshop


The Color Creator is a creative tool. Use it as often as possible in the field. Also, practice with the Color Creator in WorkSpace, and try the Color Creator with WB (Preset) combinations.

Additional reading:-
  • For more about Enhanced Raw Files and Live View - the link
  • Editing images in Live View mode with WorkSpace - link
  • Go to the WorkSpace Tips article for several tips - the link


Olympus Pen F with 25mm f1.8 Lens - ISO200, f4.5, 1/500 (only i-Enhance)

There is a general misunderstanding about iEnhance in Picture Mode. Search for more information if you haven't. Olympus added its most advanced imaging technologies into the iEnhanced Picture Mode. It has three intensity levels with instantaneous benefits for the camera and Workspace

Olympus Pen F w 25mm f1.8 Lens - ISO200, f4.0, 1/1000 (CC 19:0, EC=-2, Saturation +0.4, Curves 2:-1:-1)


Olympus Pen F w 25mm f1.8 Lens - ISO200, f4.5, 1/500 (CC 3:0, Curves 2:-0:-2)


Olympus Pen F w 17mm f1.8 Lens - ISO200, f5.6, 1/640 (WB Shadows & A-3, CC 3:0, Curves -4:-3:0)


Olympus Pen F with 75-300mm Lens - ISO200, f6.7, 1/400 (Raw edited with PhotoLab 4 & PS)


Jan 3, 2020

Olympus Color and Creative Photography - Part 6

Last Updated: 28the July 2023

Introduction.


The Pen-F continues to be an excellent camera in 2023. This is the third iteration of this article. I added a brief overview of the Olympus Color and Creative Photography program and an example of a Fuji film profile for Olympus cameras. The OMD EM5 II was the first Olympus hybrid camera with the full Color and Creative Photography package from Olympus. The Olympus Pen-F and E-M1 II introduced the new Enhanced Raw Format and Olympus Workspace.

The original design of digital cameras is based on the core elements of analog photography. The focus was photography, sensor types, manual or autofocus, and exchangeable lenses. These core elements have improved over the past 20 years, and modern digital cameras generally produce good image quality. The only negative is the price/performance ratio became worse each year.

Olympus recognized this in the 1990s and added more core elements to its strategy. They introduced the first version of the Color and Creative Photography concept with the E-30, and the original OMD EM5 was the first Olympus camera with the LIVE COMP feature. This was also the first Computational Feature from Olympus. Interestingly, competitors and reviewers ignored this development until more recently. The OMD EM-5 II and the Pen-F introduced the next generation of this strategy.


It all started with this camera in 2015. They continue to deliver exceptional value and can be found for less than $400.

We will discuss the following in this article:-

  1. Introduction
  2. A brief overview of Olympus M43 cameras
  3. The differences between Fuji and Olympus
  4. Olympus Color and Monochrome Profiles
  5. Conclusion

2. A brief overview of Olympus cameras


Imagine that Canon launched the EOS 760D, Nikon the D7200, Sony the A7 II, Fuji the XT10, and Panasonic the G7 when Olympus launched the OMD EM5 MKII. Forum "experts" and reviewers raved about the Canon and Nikon DSLRs in 2015 because they had more megapixels, dual autofocus, and Live View. At the same time, Olympus unveiled its new Color and Creative Photography concept with the EM5 II. It took most competitors 8+ years to fully compete with the EM5 II...

I update my articles as I learn more about the Olympus Color and Creative Photography strategy. This includes technical updates, general information, and more about the Olympus Live MOS sensor. Did you know Olympus identified and perfected new technologies up to a decade before its competitors introduced anything similar? The Olympus version of IBIS is an excellent example of this...

Olympus EM5 II with 60mm f2.8 macro lens - High-Resolution Mode, Color Creator, edited in Workspace.


A short summary of the Color and Creative Photography concept from Olympus:-
  1. The 1st camera that introduced the unique Color Creator was the OMD EM1.  
  2. The Olympus Pen-F introduced Color Profiles and MonoChrome Profiles
  3. The ability to tweak the camera's Gamma Curve started with:
    1. Highlights/Shadows (EM1) and the Midtones EM5 II)
    2. The "Auto" Gradation option in the Olympus E520 DSLR
    3. The Tone Curve function in Viewer and later Workspace
  4. Great features like Live Composite and Live Time are unique to Olympus
  5. The Olympus iEnhance Picture Mode plus Color Filters (basic color filters)
  6. The Olympus SCN modes and ART filters improved with new cameras - EP7
  7. Olympus replaced Viewer 3 with WorkSpace with more advanced integration
  8. Workspace introduced the Enhanced Raw Format that is unique for Olympus
  9. For example, WS has the same Image Processing environment as its cameras
  10. I discovered Workspace simulates "Live View" after hours of editing with WS
  11. Then we have the "old-school" saturation, contrast, and sharpness (all brands)
  12. Features - Pro-Capture, High-Resolution mode, Live ND, and Focus Stacking
  13. Olympus designed and added a new core element with powerful creative features

Why call it Color and Creative Photography? It's an expression of how M43 photographers see the world. Forum experts and reviewers pixel-peep or say the High-Resolution function is limited to static scenes. M43 photographers embrace new technologies like the High-Resolution function. They view food, products, sunrise or sunset, and landscape photography like high-resolution options. They will use the High-Resolution function as an ND filter for moving water and street photography. They know High-Resolution applications improve the camera's dynamic range and visible noise. Creative M43 photographers understand high-megapixel applications and celebrate new features...


Olympus EM5 II with 12-200mm Lens ISO200, f6.3, 1/650 - Enhanced Raw converted in WS - Color Creator.

Only some photographers realized what happened when Olympus introduced the new Pen-F. We can compare the Olympus Color and Creative Photography concept with IBIS. It took Olympus 13 years to create a perfect IBIS solution and introduce 7.5 stops of in-body image stabilization for the Olympus EM1 III. Promoters spend hours distracting M43 photographers by claiming Olympus didn't invent IBIS. Canon likes you to believe they did more in 1 year than Olympus did in 12 years.

While being an exciting creative camera, the Pen-F always felt like an experiment. Was this a strategic decision from Olympus to test their advanced Art Processing capabilities in the Pen F? At the same time, camera reviewers and forum promoters complained about the placement of the Creative Dial as they wisely labeled it a marketing gimmick? They also pushed for full-frame DSLRs, more megapixels, 4K video, Live View for DSLRs, Mic inputs, and headphone outputs? 

The Pen-F Press Release notice continues to be a good read in 2023.

Press release summary: The Monochrome and Color features of the Pen-F started a new era for creative photography. It allows us to apply a new color and monochrome concept, plus the ability to follow any changes in the camera with Workspace and Live View. The Pen-F and the EP-7 are the best choices for photographers wanting advanced Color and Creative Photography features.


Olympus Pen-F with 17mm f1.8 lens - ISO500, f4.5, 1/60 - Enhanced raw file edited in Workspace - Color Creator.


3. Color Profiles and the differences between Fuji and Olympus


This is a great subject and could fill many pages of a separate article. I have been using Fuji for more than 2 years. The reason I bought the X-T4/5 is the ongoing uncertainty about OMS. OM-System did a great job launching the Olympus OM-1 and deserves positive feedback. I prefer Olympus used cameras like the EM5 II/III, Pen F and EP-7, OMD EM1 I/II/III, and the Olympus OM-1.

I prefer to support manufacturers with a history in the photography segment. Fujifilm is one of those companies. I bought my Fuji X-T5 shortly after it was introduced. The Fuji X-T5, Olympus EM1 III, and Pen F are great examples. The long-term viability and future of OM-System continue to be an open question. See my thoughts on the new O-M5, the OM1 II, and the lack of a Pen F II.

3.1 What's the difference between Olympus Color Profiles and Fuji


The difference is X-Trans sensors and the Color Filter Array. Don't let reviewers or forum promoters tell you it's Fuji marketing like they did with Olympus. Fuji is a market leader in traditional analog photography and how to integrate that experience in its modern X-Trans image sensors. Do your own research by starting with the above Fuji information.


Fuji cameras come with a selection of up to 18 film simulations like Provia (standard), Velvia (Vivid), Astia (soft), and several B&W and monochrome options. Each has a unique description to guide the photographer when selecting a film simulation. I never saw similar film simulations for Olympus or any other camera brand. One can add a Color Chrome Effect to these film simulations and the blue skies. The color chrome effect reminds me of the Color Creator from Olympus.

Study this link about the Fuji X-T5 and go down to the film simulations. The biggest strengths of Fuji and Olympus cameras are color, image quality, and the option of having the final image in the camera. The Fuji film simulations and JPEG files are superior to any other brand, and the Olympus Color and Creative Photography concept is better than anything else in this segment...

Fujix Weekly developed a unique community of Fuji owners. They created film filters like the one below. These filters are based on standard Fuji film Simulations with simple variations of basic camera settings. See the example below.


A new color Color Filter for the X-T5.


How to copy Fuji's film simulations for Olympus:-
  • Fuji Film Simulations - The Pen-F and E-P7 are the only cameras that can do this
  • Fuji Film Simulations - Workspace compliments the Pen-F and the E-P7 functions
  • Clarity and Color Chrome - Use Clarity in WS and the Color Creator = Chrome Effect
  • DR100%, DR200% - this is a clever feature from Fuji (See this article for more info)

EM5 II with the Lumix 35-100mm f2.8 lens - ISO200, f5.6, 1/250 - Raw file converted in WS - I added a Chrome effect with the Color Creator.


Is it possible to use Fujix Weekly Color Filters with the EM5 III? We first need to study the Fuji Film Simulations and their descriptions. The next step is to replicate Fuji Film Simulations for the EM5 III. Some presenters say it's possible with the OMD and PEN cameras. I found these Fuji film simulations are too complex for OMD cameras. Only the Pen-F, E-P7, or Workspace will replicate them.

For example, the Classic Chrome Simulation description says, "slightly desaturated colors (reds and greens) with stronger shadow contrasts for dramatic lighting, retro-style subjects, and reportage projects." It's a safe place to start replicating these Classic Chrome Film attributes with something like the Olympus EM10 II or the EM5 II. These are the settings I used:
  • Desaturated Colors - Select the Muted Picture Mode plus A -2 and G -2 (SCP)
  • Desaturated Colors - Go to the SCP and set the RGB setting to -2
  • Harder Shadow Contrasts - Select Highlights +2, Shadows -3, and mid-tones -2
  • We can do more with the Pen-F because it's better at adjusting individual colors.

The above settings replicate only the Classic Chrome Film Simulation. The Kodachrome 64 Filter settings have to be added on top of that. This is a process of working on the different parameters until you reach the right look. I tested the above profile with my EM5 II against the XT-5. I could only get approximately 85% of the Classic Chrome simulation with my EM5 II. I also used the Color Creator to create a Chrome effect with the following settings: Color = 2 and Vividness = -2.


Fuji X-T5 with 27mm f2.8 lens - ISO400, f5.6, 1/1100 (Provia/Standard).


Olympus EM5 II Kodachrome 64 Profile

  • Picture Mode: Muted (See this video)
  • Grain Effect: Set the max ISO to ISO1600
  • Color Chrome: Use the Color Creator (See this article)
  • White Balance "Daylight": (A 0) and (G -7)
  • Highlight: +2
  • Shadow: -3
  • Midtones: -2 (Adjust between -1 to -2)
  • Gradation: Normal
  • Color: -1 (RGB)
  • Sharpness: +1
  • Noise Reduction: None
  • Clarity: Can be added in Workspace (Enhanced Raw File)
  • Auto ISO up to ISO2000 (fixed)
  • Exposure Compensation: 0 to +2/3 EV

The main difference between Olympus and other cameras is the Pen F and the Pen E-P7. The "Color Adjust" and Monochrome Profile functions are far superior. I am not planning to copy more Fuji film simulations or Fujix Weekly Filters for Olympus cameras. Your best option is to buy a secondhand Fuji camera like the XT-20/30 if you like to try Film simulations or Fujix Filters...


Olympus EM5 II with Lumix 12-35mm f2.8 lens - ISO200, f6.3, 1/400 - Raw edited in WS with Color Creator.


4. Color and Monochrome Profiles


This is the final article in this 6-part series discussing Color and Creative Photography. Did you know all the color settings on your Olympus camera are available in Workspace and the Enhanced Raw Format? It's possible to tweak your Color Creator, Color Profiles, and Monochrome Profiles in Workspace. It's the only raw converter that accesses the camera's Art Processor.

I decided to rewrite this section and focus on one question only. What do we need to develop profiles, and what are the main steps when creating color or monochrome profiles?

I did only a few color profiles because I prefer how photographers benefit from learning to work with color. I hate to be the reason why photographers accept things like the "size and capture" theory. Some of the most critical skills in the modern age are critical thinking and a creative mind...

4.1 The Color Wheel


The Color Creator, the Adjust Color, and the Monochrome Profile functions are all based on the RGB Color Wheel. I created the one below as I studied my new Pen-F. I learned much from designing the color wheel and adding the specific Olympus information on the Color Wheel.

Do we need a Color Wheel like this? We don't need one because the Color Creator, the Adjust Color, and Monochrome Color Wheels are similar. These functions can be used to make quick decisions, like finding opposite colors or color harmonies. See this article for more about the Color Wheel, Opposite Colors, and Color Harmonies.

Opposite Colors are critical for Olympus. For example, how does one adjust the White Balance setting with the Green and Amber options in the SCP? Cameras like Fuji or Panasonic use a nifty color matrix function to fine-tune the WB. It relies on Opposite Colors and the Color Wheel. I added the Olympus WB adjust sliders to the Color Wheel. The opposite of amber is blue, and green is magenta. Positive values change the colors amber and green, and negative values are magenta and blue. Study the WB adjust sliders on the color wheel. Also, study the WB sliders in Workspace.


4.2 What do we need for Color Profiles?


Practice with the Color and Creative Photography functions as much as possible. Master your Olympus camera functions and Workspace. For example, do you visualize concepts like the SNR to ISO ratio or any adjustments for the Color Creator? Do you use the Color Creator?

The following illustration summarizes the Color and Creative Photography features of Olympus. We can create Color Monochrome Profiles in the camera or with Workspace. The Enhanced RAW Format helps us to test our profiles on our PCs. The only differences between Olympus cameras and Workspace are Tone Curves adjustments and the Hue and Brightness sliders for the Color Adjust function in Workspace. Only Workspace will combine multiple options like ART and Color Filters. 


The video below discusses Color and Creative editing examples. Also, see this video on how to edit your images in Workspace. These two videos give a good introduction and advanced overview of Workspace. The secret is to spend time and do lots of editing and practicing with Workspace. YouTube selected a lower resolution for this video. Goto settings and set the resolution to 1080p.


The following YouTube Video gives a short introduction and overview of FujiFilm X Raw Studio. The information will help you to see the differences. The sound is not OK. I am planning to do more recordings on Fuji.


5. Conclusion


My goal was to assist readers in learning more about the Color and Creative Photography features of Olympus. Yes, we can get similar results with Lightroom or Photoshop, but having your camera settings available in Workspace is super special. Workspace, therefore, requires a different editing style that needs time to practice and master. Workspace also works best for photographers who do things right with their cameras. Workspace is NOT a rescue package for incorrectly exposed images...

The benefit of regularly working with Workspace is your editing skills and ability to develop color profiles improve. See this article (Technique 19) for more on Workspace and working in Live View. 

It's becoming more difficult to find secondhand Pen-F cameras in excellent condition. Get yourself a Pen-F or the EP-7 if you find one in good condition. These cameras will continue to be the ultimate creative color tools for Photographers. The E-P7 and its excellent image quality are a good choice.

Here are the first 5 articles in this series below:-

  • A new color strategy from Olympus, Part 1 - link
  • Digital Cameras and Color Accuracy, Part 2 - link
  • Color Wheel and Olympus Color Creator, Part 3 - link
  • The Color Profile function in WorkSpace, Part 4 - link
  • Using your camera and editing in WorkSpace, Part 5 - link


VideoPic Blog Comments

Please add any comments to this article here.

Most read Articles