Info:- The Pen F, E-P7, and the OM-3 adjust both targeted and global colors. Other brands (LUTs) make global adjustments.

Apr 30, 2023

How to use the Olympus Gradation Function?

Last Update:- 10th March 2025

Introduction.

Olympus cameras offer a unique blend of Creative Color and Computational Photography tools that go beyond traditional sensor-based imaging. Features like Live Composite, Live Time, Focus Stacking, Live ND Filters, IBIS, and the High-Resolution mode gave photographers powerful creative control.

While the mainstream view focuses on sensor size as the defining factor of image quality, it overlooks the crucial role of image processing and tonal control. Olympus took a more integrated approach, where the TruePic processor, sensor design, advanced tonal adjustments, and computational features work together to optimize the recorded image signal. One such feature is the Gradation function, which enhances highlight and shadow detail in-camera and Workapce. This article explores how ETTR and Gradation interact with the camera, the TruePic processor, and OM System (Olympus) Workspace, providing a deeper understanding of their impact on color, image tones, and exposure.


Olympus EP-7 with the 45mm f1.8 lens, Gradation = "Auto." The Enhanced Raw Files were converted and edited in Workspace.


We reviewed the benefits of sensor saturation and using higher SNRs. For example, how does one increase the sensor's Saturation and SNR? Do we select higher ISOs, or do we increase the reflected light on the sensor? We discussed ISO amplification versus the role of the Aperture and Shutter. The ISO amplifies the image signal from the sensor and tonal (Gamma) adjustments are a function of image processing. We will use this knowledge to learn more about the Gradation function.


Figure 1.


The above diagram is one of the most critical guides for Olympus photographers. Digital cameras have a lens, sensor, and image processor. The lens funnels the reflected light onto the sensor, the sensor captures data, and the image processor processes data. The above illustration shows what happens when. For example, tonal adjustments only happen once the sensor records the image data (reflected light), and the ISO amplifies the image signal from the sensor. This raises the question, should we set our exposure before we finalize our tonal adjustment in the camera or Workspace?

Tip: We use the Exposure Compensation Slider to tweak the exposure in Workspace.

Olympus photographers manage the following in the camera and Workspace:
  • Exposing the sensor (Aperture/Shutter combo - ISO amplifies the image signal).
  • Finalizing the exposure (Exposure Comp. in Workspace = the ISO in the camera).
  • Tonal and global color changes + specific colors with the Pen F, E-P7, and OM-3.
  • Tweak all these Tonal, Global color, and specific color adjustments in Workspace.
  • TruePic Editing settings (Saturation, Contrast, Sharpness) are not shown in WS.

Although the ISO function is part of the camera's exposure formula, one of the most important aspects of digital photography is managing the sensor's exposure (aperture and shutter) separately from the sensor's image signal (ISO and tonal adjustments). Unique to Olympus is having the camera's settings in Workspace via the Enhanced Raw Format. Fuji has something similar to Workspace with Raw Studio. Raw converters like Adobe Lightroom, DxO PhotoLab, and others do not have the same access to the camera's exposure and tonal adjustments.

TIP: View the images on a large screen and study the descriptions...

EM1 III with the 12 - 45mm f4.0 Pro lens - ISO200, f5.6, 1/1.16Sec, +0.7EV - The focus stacked OOC image was edited in Workspace.

My wife bought the lovely flowers, and I created the small studio. I used my EM1 III, tripod, diffuser, and Rotolight Neo 2. Did you know that, if necessary, the Gradation function will "tweak" the camera's exposure settings? Do a quick experiment and try the 4 Gradation options with a fixed ISO and the camera set to Aperture Mode. Use the camera's SCP and a constant FOV with a tripod.


The Gradation function is an interesting option. Its primary role is different Gamma (tonal) profiles, and its secondary role is monitoring exposure and changing the camera's exposure if necessary. Think of the Gradation function as your "highlight/shadow clipping" watchdog. There are two aspects to Gradation profiles we need to consider. One is the exposure measurement (Spot, ESP, High, or Low) method we select and the other is the Gradation profile. They are powerful exposure options.


A focus-stacked ISO3200 example. I used 4 (bracketed) Enhanced Raw Files and applied the AI noise filter before stacking them in Workspace.


We will discuss the following:

  1. Introduction
  2. The Gradation function has 4 Tonal Profiles.
  3. The three reasons why photographers use ETTR in 2025
  4. Practical discussion on using ETTR with Olympus cameras
  5. A brief overview of noise and the Olympus Noise Filter...
  6. Conclusion


The Pen F and 17mm f1.8 lens (Edited version). I selected Gradation High in my Pen F and Normal to "color grade" the Enhanced Raw File.


2. The Gradation function has 4 Tonal Profiles


The Gradation function has four unique Tonal profiles, each with unique tonal properties. If necessary, the AUTO, High Key, and Low Key profiles will change the camera's exposure settings. 

The following table is a summary of these Gradation Tonal profiles:

Source: Olympus Pen F User Manual                    


I have been using Gradation more frequently over the past year. For example, we can cancel or select the AUTO option while converting an Advanced Raw File in Workspace. It's better to select AUTO in the camera because it also monitors the camera's exposure settings. One can then use Workspace to keep the Gradation profile in AUTO or change it to Normal. I use the Highlight, Mid Tone, and Shadow sliders to fine-tune the final Tone Curve. Keep in mind we can apply these changes in the camera or Workspace. I use the following sequence when I convert my Ehanced Raw files in Workspace.


In a previous article, I said that the gradation function could simplify ETTR. This article explores this option. Folks, Olympus cameras don't need ETTR for good image quality. It's a specific technique photographers use to reduce visible noise and record more tonal data. Older Olympus M43 and 4/3 cameras from 2012 and older benefit more from ETTR. Workspace and Olympus cameras from 2012 onward have excellent noise control and deliver great results without ETTR.

PS, you could decide to have a little fun with FF photographers relying on the sensor to do everything.


I often experience the WOW effect as I learn more about the computational features of Olympus. The Gradation "High" option is like a V-Log profile and the "Normal" option is the standard Gamma Curve. I tried the "High" option with my EM1 III and reverted to the standard profile with the Enhanced Raw File and Workspace. This means it's possible to apply ETTR without much editing.

Why do we use the Mid-Tones slider to set the final image brightness? Because it does not affect the camera's Neutral Gray values. Neutral (18%) Gray means the camera's image colors are accurate. The exposure compensation slider is linked to the exposure formula which adjusts the camera's color values. (Ref. Zone System. - See the illustration in Fig. 1) Exposure settings are part of the exposure formula and White Balance values. The Mid-Tone slider adjusts the tonal or Gamma curve. That's why we treat the exposure and mid-tone settings separately in the camera or Workspace. Does this also apply to ETTR? Yes, we correct our ETTR settings with the exposure comp slider in Workspace. The camera's Gradation High option can be set (reset) back to Normal in Workspace.

Did Olympus change or improve the Gradation function (Tone Curves) in the past 10 years? They said they did in the EM-5 press release. I didn't verify improvements for more recent cameras...


The unedited OOC jpeg of the above image with the Gradation option set to High. I used the Gradation function for ETTR.


3. The three reasons for using ETTR in 2025


Here are the 3 main reasons for using ETTR:-
  1. Cameras do not saturate the sensor in Auto Exposure mode
    1. The reason is a built-in DR safety margin for Auto users...
    2. These safety margins impact shadow details and noise
    3. ETTR enables photographers to saturate the image sensor
    4. How did I learn this? Research and studying Olympus info...
  2. ETTR helps us to improve the sensor's Signal to Noise ratio (SNR)
    1. The visibility of the sensor's noise floor increases at lower SNRs
    2. Upping the SNR means the sensor's noise floor becomes less visible
    3. ETTR is especially effective for darker shadow areas in an image
  3. ETTR improves the tonal data collection in the shadow and Mid-Tones
    1. Sensors are linear devices. That's why we have a Gamma Profile
    2. The Gamma curve's data distribution (Histogram's right side = more data)
    3. ETTR shifts the tone curves to the right which means more tonal data

See this article discussing exposure, gamma curves, and tonal data...


4. Practical discussion about ETTR and Olympus


Gradation is one of several tonal and computational features of Olympus and a powerful ETTR tool. The Gradation HIGH option automatically saturates the sensor without clipping the highlights (EM5 Press Release). That means Workspace, the Enhanced Raw Format, and the Gradation High option help us to saturate the sensor, increase the SNR, and shift the camera's histogram to the right. We reset (normalize) the HIGH option with the "Normal" option in Workspace. 


The converted 16-bit Workspace Tiff file will have a higher SNR, more tonal data, a regular image look, and more flexibility when editing in Photoshop.

Here are a few general and practical Tips:

  • Our goal is more light on the sensor (camera settings, time of day, and flash)
  • It's critical to be clear about the role of the ISO versus the Aperture/Shutter.
  • Use a fixed ISO value to prevent the camera from randomly upping the ISO
  • Never disregard the importance of having a flash to add more light to the sensor
  • It's a good idea to let the camera set the White Balance. (Not critical for ETTR)
  • It helps to use a flat Highlights/Shadows tonal profile with Gradation High...
  • Experiment with Histogram extremes and monitor ETTR with the Histogram.
  • Use the histogram and control Gradation High with a negative exposure comp. 

Olympus Pen F with 45mm f1.8 lens. ISO1600, f7.1, 1/8 Sec. Converted and "color graded" in Workspace, no noise reduction.


Experiment with Gradation High and the Highlight/Shadows sliders to create your own "ETTR" profile. A flat Tone Curve means lower Highlight values and higher Shadow values. (Try Highlights -3 and Shadows +4). Use the same principle of having a Tone Curve in the camera and a "Normalization Profile" for Workspace and the Enhanced Raw File. Normalizing the camera's Tone Curve (profile) does not mean opposite values such as a V-Log Profile. It simply means returning the camera's tonal values to the default values in Workspace (Highlights 0, Mid Tone 0, Shadows 0). The Enhanced Raw Format helps us to normalize our image to Neutral Gray in Workspace with the exposure comp slider. Practice because it's not always necessary to normalize your camera settings in Workspace.


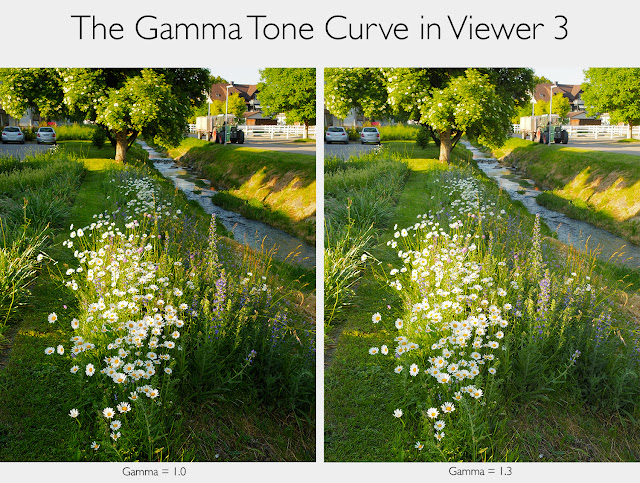
Most Raw Converters use standard Gamma profiles to convert the sensor's linear data into a display format. The older Olympus Viewer 3 editor, had a basic slider to tweak the camera's Gamma curve. The Workspace Gradation, Highlights/Shadows sliders, and Tone Curve options are a refined version of what we had in Viewer 3. The Tone Curve function is only available in Workspace.


The Olympus FL300R needs almost no space.


Does the Normalization Profile affect the ETTR exposure benefits? ETTR happens in the camera. That means it improves the recorded image signal. Workspace does not add or remove light from the sensor, which is why it's possible to practice the visual effects of ETTR profiles (Exp. Comp. and Tonal Curve) in Workspace. In other words, Workspace prepares the final image look and feel.


Did the noise disappear in the above illustration? No, the size of the sensor's noise floor stayed the same. We only increased the SNR, which means the noise floor became less visible. Is it correct when reviewers say smaller sensors have more noise? No, ALL sensors have a noise floor and SNR.

The Olympus XZ-2 is a great compact. I prefer to get my information from manufacturers and not camera reviewers or forum advisors. My knowledge and research of digital cameras are also a great help. Discovering the XZ-2 and the satisfaction of having oldies like the XZ-1 and the XZ-2 is fantastic. For example, the XZ-2 has a 12MP BSI sensor, and the XZ-1 has a 10 MP CCD sensor.


Olympus Stylus XZ-2 - ISO100, f4.0, 1/500. The Gradation Auto option of the camera, and color-graded in Workspace.


The EP-3 is another excellent older M43 camera. I took my Olympus EP-3 and the 12-50mm lens for a late afternoon walk with our dog. The XZ-2 and the EP-3 are compatible with the VF-4 Electronic View Finder. The Olympus XZ-2 was set to Auto Gradation in the above image.

I typically use 2-steps to convert and edit my Enhanced Raw Files. In step 1, I select and tweak my camera settings with Workspace (See editing sequence above), and step 2 is more advanced editing. Advanced editing can be done in Workspace or something like Photoshop. For example, I used the Gradation Auto option, Highlights/Shadows, and Tone Curves to convert the raw file below. We only need Step 1 or the converted 16-bit Tiff file to post-process an image in Photoshop.


The EP-3 and the 12-50mm lens - ISO3200, f5.2, 1/80 - I converted the Enhanced Raw File with WS (Noise Filter = Low) and tweaked it in Photoshop.

The EP3 raw file was converted with PhotoLab 5, and I used DeepPrime (AI Noise Filter). The final image was edited with Photoshop.

5. A brief overview of image noise and the Olympus Noise Filter


Olympus photographers should experiment with the camera's Noise Filter. The main reason newer camera models have less noise is the smaller noise floor of modern sensors, higher sensor sensitivity, and more processing power like the original E-M1 versus the E-M1 III. DxO PhotoLab became my benchmark for rating the camera and Workspace noise filters. For example, the PhotoLab Prime option is enough for my general photography needs with PEN, OMD, and XZ-2 cameras.

Modern Olympus cameras and Workspace have excellent Noise Filters. The Workspace AI noise filter is enough for most situations with the EM1 II/III or the OM-3. My default Olympus Noise Filter setting is "Low." I prefer the "Low" option for my Olympus cameras. One can always use the Enhanced Raw Format to change to the Standard or High options in Workspace. I rarely use the additional two sliders in the Workspace. Study this article for more on image noise and image sensors.

I used the Gradation "Auto" and Noise Filter "Low" options for the image below. I was surprised at the excellent DR and IQ of my Pen EP-3 and the XZ-2. The Pen EP-3 is a surprisingly good camera when you ignore marketing filters. For example, always study the Official News Release when you study Olympus cameras. See the Stylus XZ-2 News Release.

The reason for less shadow noise (image below) must be the XZ-2 sensor's small noise floor, and the SNR was high at ISO100. Shadow Noise (visible noise floor), increases at ISO800. The reason is the sensor receives less light at ISO800. The size of the sensor is irrelevant when I use my Olympus. I only consider the sensor's available light, Tonal adjustments, and optimum SNR values.


Olympus XZ-2 - ISO100, f4.0, 1/400 - ND filter ON.

6. Conclusion


Marketers mislead photographers with statements like "Workspace is only a supplier raw converter." Why shouldn't we compare Workspace with Lightroom, ON1, and Capture One? Because these Raw Converters cannot simulate your Olympus camera settings. It's not the first time that Marketers made fake statements to distract photographers. Micro Four Third cameras were some of the most filtered (marketing) products in 2023. How many photographers are familiar with the Olympus Color and Creative Strategy and how it was launched with the Olympus E30, EM5 MKII, and Pen F?

Folks, we don't need ETTR to get good results with M43 cameras. Knowledge gives us an overview of photography. Knowledge empowers photographers to improve their image quality, and knowledge is a light placing a different perspective on the misleading filters marketers place on people.

For more on Creative Color and Computational Photography, see this article.

Take care and God's Bless

Best

Siegfried


A few casual images while walking the dog...


The images below are from my Pen EP-3 and the 75mm f1.8. I didn't use any special camera settings. The images benefited from converting the Enhanced Raw Files in Workspace. I used the adjustments below with my raw files before exporting them as 16-bit Tiff files to Photoshop.

Older 12MP sensors have more noise (a larger noise floor) than newer M43 sensors. The skies from these older cameras were known for more visible noise. The Noise Filter "Low" option was enough to clean the skies without losing details. It helps to apply the  SNR-to-ISO ratio with older sensors.


These are my final post-processing steps in Photoshop:-
  • I cropped the image for Instagram (4:5 ratio)
  • I added a little contrast with Curves in Photoshop
  • I sharpened with the High Pass Filter (setting = 1.6)
  • Using a "Soft Light" blending mode on a duplicated layer


Olympus EP-3 and 75mm f1.8 lens - ISO200, f5.6, 1/800.


Olympus EP-3 and 75mm f1.8 lens - ISO200, f5.6, 1/200.


Olympus EP-3 and 75mm f1.8 lens - ISO200, f5.6, 1/800.


Olympus EP-3 and 75mm f1.8 lens - ISO200, f5.6, 1/1000.


Olympus EP-3 and 75mm f1.8 lens - ISO200, f5.6, 1/500.


Olympus EP-3 and 75mm f1.8 lens - ISO200, f5.6, 1/160.


Olympus EP-3 and 75mm f1.8 lens - ISO200, f5.6, 1/640.


Olympus EP-3 and 75mm f1.8 lens - ISO200, f5.6, 1/160.


Olympus EP-3 and 75mm f1.8 lens - ISO200, f14, 1/80.


Olympus EP-3 and 75mm f1.8 lens - ISO200, f5.6, 1/400 (Action shot).

Apr 11, 2023

A few casual photos from my Olympus Pen EP-7

 Last Updated:- 14th April 2023

Everything changed as I uncovered more technical information about digital cameras. I spent months searching and studying credible information about cameras. Did my image quality benefit from this learning curve? For example, how much does a new camera or fine-tuning my exposure with the SNR to ISO ratio improve my results for 2023? My first reaction is not much. The correct answer is not a fixed improvement because most image quality improvements vary from case to case.


Pen EP-7 with 75mm f1.8 - ISO250, f2.0, 1/160 - Raw edited with WS - Pop ART filter adjusted + soft focus. 


We also need to consider the technical aspects of image quality. A basic description of image quality should always include things like shadow, midrange, and highlight data. The next step is optical variables like DOF, focusing, and composition. Most cameras capture good tonal data in the midrange and highlight areas. A common challenge is capturing good shadow data.

You will find my overview/review of the Pen EP-7 here.


This is the most exciting configuration for the Olympus PEN EP-7. The 17mm f2.8 lens is fantastic...


The critical part of studying digital cameras is finding credible info while staying focused on the fun part of digital photography, image editing, and the camera. For example, always keep a camera with you? It's a simple measure of having a healthy passion for photography. It's sometimes difficult, but people appreciate discretion, and nothing is as rewarding as sharing your results.

The Olympus PEN EP-7 captures good shadow details and is small enough to always keep with you. I like the above configuration with the 17mm f2.8 or f1.8 Zuiko lenses and the Olympus Optical Viewfinder. The Zuiko 17mm f2.8 lens oozes creativity and is almost always on my Pen EP-7. I have an older black/gray Olympus shoulder bag for my Olympus Pen F or EP-7. The 17mm f2.8 is also one of a few M43 lenses that are excellent for recording 3D-looking images.

Many photographers like a "3D look" or a sense of depth in their images? How does one create this 3D look? With the lens, composition, background blur, leading lines, or shadows?


The combination of Workspace, the Enhanced Raw Format, and Olympus cameras benefit the look and feel of our final images. It also improves the photographer's creative process while editing with WS or photographing the "edited" version of the photo with the camera. Practice these skills in the camera and Workspace. This process should be an integral part of your photography.

The EP-7 has just enough features to stay focussed on photography. How many knew that 90% of the Pen F or EP-7 and Workspace settings are the same? For example, the highlights and shadows function is part of the camera's exposure calculation. Neutral gray changes as we set the highlights, shadows, or exposure compensation. We can adjust or correct this in the camera or Workspace.

For more about Workspace and the Enhanced Raw Format, study this article.

How many of you saw the ART filter upgrades in Workspace or some of the newer Olympus cameras, like the EP-7? They are great for tweaking these final ART filter effects. Target primary or secondary colors or any opposite combinations in the scene. See the examples below and study this link.


Olympus Pen EP-7 with 17mm f2.8 lens - ISO200, f6.3, 1/200 - Raw edited in WS - Color Creator 9:0.


EP-7 with 12-50mm f3.5-6.3 - ISO200, f6.3, 1/60 - DxO PhotoPack Generic Fuji Provia filter.


Olympus EP-7 w 17mm f2.8 lens - ISO400, f5.6, 1/80 - Raw edited in WS - Partial Color ART Filter


The above image is an interesting example. I used the Partial Color ART filter twice and combined the 2 results in Photoshop. I applied the Soft Focus Effect in the ART filter and adjusted the intensity with the Clarity and Dehaze sliders. I used a Color Filter in Workspace and duplicated the background layer in Photoshop to add a Soft Light Blending effect. It is possible to edit or adjust the intensity of each step. I used DxO FilmPack to select a frame for the image.


Pen EP-7 w 17mm f2.8 lens - ISO250, f6.3, 1/200 - Raw edited in WS - Instant Film ART Filter w Soft Focus.


Olympus Pen EP-7 with 17mm f2.8 lens - ISO200, f6.3, 1/400 - Raw edited in WS - MonoChrome Profile.


Pen EP-7 w 17mm f2.8 lens - ISO200, f6.3, 1/250 - Raw edited in Workspace - 1020 Color Profile.


Olympus Pen EP-7 with 17mm f2.8 lens - ISO60, f6.3, 1/200 - Raw edited in WS - My own FujiFilm Velvia 100 Color Profile.


Pen EP-7 with 17mm f2.8 lens - ISO200, f6.3, 1/1000 - Raw edited in WS - MonoChrome Profile + Color Filter.


Olympus Pen EP-7 with 17mm f2.8 lens - ISO200, f6.3, 1/200 - Raw edited in WS - Instant Film ART Filter.


Olympus Pen EP-7 with 17mm f2.8 lens - ISO200, f6.3, 1/200 - Raw edited in WS - Instant Film ART Filter.


Olympus Pen EP-7 with 17mm f2.8 lens - ISO200, f6.3, 1/320 - Raw edited in WS - Pop ART Filter w Soft Focus. (Nice 3D Look)


Pen EP-7 with 17mm f2.8 lens - ISO200, f6.3, 1/200 - Raw edited in WS - Grainy Film ART Filter.


Olympus Pen EP-7 with 17mm f2.8 lens - ISO200, f6.3, 1/200 - Raw edited in WS - Color Creator 2:-1 - DXO PhotoPack Frame.


Pen EP-7 with 17mm f2.8 lens - ISO200, f6.3, 1/200 - Raw edited in WS - Diorama ART Filter.


This image was taken in South Africa. The EP-7 is a great little camera...


Mar 13, 2023

The 7 points each Digital Photographer should know

Last updated:- 3rd August 2023

Introduction.

This article reviews 7 technical points each digital photographer should know. They also explain why photographers are the creative power behind photography. These technical points can be regarded as "enablers" to improve your Image Quality. The fun or creative part of photography also improves with these 7 points. Knowledge is an integral part of our journey with digital cameras...


Olympus E400 with 25mm f2.8 lens - ISO100, f7.1, 1/160 - It's a 10MP, 4-Thirds CCD sensor. It's the OOC jpeg.


Technical and theoretical information is part of a general process of improving our camera skills. It explains how to improve our exposure skills (SNR to ISO ratio) and our ability to visualize the sensor's Saturation (performance) and SNR (noise) levels. Knowledge is always critical...

Technical information also helps us explain why Olympus used a 20MP sensor for the OM-1...

There's only one right way to discuss and study digital cameras.


Many photographers prefer a more simplified technical conversation. I listed 7 points to assist them in this learning process. It highlights only the most critical points photographers should know.

These 7 points are:

  1. The exposure triangle works for analog & digital cameras.
  2. Know the image signal path from the subject to the SD card.
  3. How to manage the sensor's performance and the SNR ratio.
  4. The 7 steps manufacturers use to manage the image sensor.
  5. The basic types of noise and how to control image noise.
  6. Various kinds of CMOS sensors and why the differences.
  7. A basic illustration that summarizes all digital cameras.

These 3 points are also critical when we evaluate different cameras:
  1. Optical differences - Always consider the differences between formats
  2. Technical similarities - This article focuses on the technical similarities
  3. Editing Software - We shouldn't ignore the importance of image editing

Why is the Olympus X-Z2 such an interesting digital camera in 2023?


Why do we benefit from technical discussions? Knowledge is the enabler every photographer needs to master his or her digital camera. Knowledge empowers us to manage the sensor's performance and not simply rely on size. Pixels capture Photons and not the size of the sensor's backplate. For example, did you know the Effective Pixel Area is more important than the size of the sensor? Each pixel's control wiring reduces the light-sensitive area of the pixel. This means standard CMOS sensors have a smaller Effective Pixel Area (67%) than LiveMOS (85%) or BSI CMOS (97%) sensors.

Consider the following 10 points when evaluating your next camera:
  1. The focus should be on pixels because pixels capture photons
  2. Fewer pixels mean a smaller noise floor and better efficiency
  3. The type of sensor influences the sensor's effective pixel area
  4. More resolution means smaller pixels with smaller pixel areas
  5. Pixel area influences Optical Efficiency and sensor sensitivity
  6. More pixels means more pixel control wiring with more noise
  7. M.Zuiko Standard & Premium lenses are SMALL and excellent
  8. Each sensor size has different & unique optical characteristics
  9. The size of the sensor does not change its technical limitations
  10. Stacked BSI sensors are known for fast sensor readout speeds

1. The Exposure Triangle


The Aperture and Shutter Speed control how much light is reaching the film strip in analog cameras. Older film cameras have a mechanical ISO (ASA) adjustment dial. The ISO synchronizes the camera's exposure "calculations" with the film's sensitivity rating. The ISO is set once for each film.

The Aperture and Shutter functions are the same for digital cameras. The sensor's final sensitivity is measured and set at the factory. In other words, it's calibrated for your digital camera. The sensor's sensitivity doesn't change once it's calibrated. The ISO's function is different for digital cameras. It amplifies the sensor's output signal and is a critical part of the exposure formula. The ISO and the Workspace Exposure Compensation functions adjust the camera's image brightness.


The ISO also amplifies the image sensor's noise floor. It's, therefore, not correct to say the ISO creates noise. All sensors have an active noise floor when the camera is on. We can influence the visibility of the sensor's noise floor (image noise) with the SNR to ISO ratio. That means our goal is to improve the sensor's saturation and the SNR by "managing" the reflected light reaching the sensor.


Olympus E30 with 14-54mm f2.8-3.5 Pro Lens - ISO100, f7.1, 1/400 - This is the OOC jpeg image


2. The image signal path from the subject to the SD card

Study this link for more information on points 2, 3, 4, and 5. The challenge was to create a basic but theoretically correct model to explain the digital camera. The secret is to exclude any technical data with no practical value. It's easy to discuss and quote useless charts and information.

Familiarize yourself with the following illustration explaining the image signal path...


Promoters distract photographers by claiming the A/D converter is part of the pixel's architecture. While correct in some cases, we know the basic flow diagram in the above illustration stays the same. One can say much about the technical details of digital cameras. The question should always be, will any new claims or information improve my photography, or is it more useless information?

3. How to manage the performance of the Image Sensor


This illustration shows how we manage the image sensor and the sensor's noise floor. A more detailed description of managing your sensor's performance is available here. (See section 5)


Photographers don't think of exposing the sensor and amplifying the image signal. The aperture and shutter speed "expose" the sensor, and the final exposure (image brightness) is set with the ISO. This concept forms the foundation for improving our image quality with M43 cameras. This is also how we manage the sensor's performance. The goal is to increase the light exposing the sensor. Increasing the reflected light on the sensor means less visible noise and better tonal data.

Assume you have a choice between ISO1250 and ISO1600. Most photographers would select ISO1600 without considering the image signal. That means the sensor received less light at ISO1600. That will reduce the sensor's saturation level and SNR. The resulting images will have less tonal data with more visible image noise. Your digital photography and exposure skills will grow in leaps and bounds as you grasp this simple concept and make it a part of your digital photography.


Olympus E420 with 18 - 180mm lens - ISO100, f6.3, 1/320 - The Enhanced Raw File was edited in Workspace.


Why should we edit our images to the correct exposures? Study the exposure formula here. Always use neutral gray (18%) exposure and WB values. This supports accurate image colors. This also means resetting your ETTR or SNR-to-ISO ratio to neutral gray in Workspace. Study this article on how to reset your camera adjustments. Always do your editing with 18% gray brightness levels. That's why you should include Workspace and the Enhanced RAW Format in your image-taking process.

4. The 7 steps manufacturers use to improve image sensors


The following illustration describes the 7 questions manufacturers ask when designing new cameras. For example, one critical aspect of selecting an appropriate sensor is Sensor Readout Speed. This impacts the camera's Silent Shutter or Rolling Shutter efficiency. Standard CMOS sensors are known for having slower readout speeds. Stacked BSI sensors solved this problem with higher sensor readout speeds. Stacked configurations are unique to Stacked BSI "CMOS type" sensors.

Study the illustration below...


5. The basic types of noise and how we control image noise

I always wish someone would ask the question when I see statements like smaller sensors have more noise. What question? The question is simply, where does image noise come from..?

Study the link in section 2 for an overview of the illustration below. Each digital photographer should master the Photons to Electrons graph in this illustration. The most important thing to learn from this illustration is sensors perform at their best when fully saturated. Our goal should always be more reflected light to saturate the sensor at each ISO. This technique is better known as ETTR. The Shutter Speed and Aperture control the light exposing the sensor. The histogram shows what's happening at the sensor with a fixed ISO. Study the exposure formula for more info...


Study these points explaining the graph:-
  • The camera's aperture and shutter speed controls the light reaching the sensor.
  • The sensor is fully saturated at its native ISO and with the exposure at point B.
  • A fully saturated sensor means we have the highest signal-to-noise ratio (SNR).
  • Cameras have a safety buffer in Auto Mode. They will not expose up to point B.
  • This safety buffer results in a lower SNR and the histogram moving to the left.
  • ETTR means we control the exposure. The goal is to saturate the image sensor.
  • Study and understand the noise floor. Fewer photons (light) means a lower SNR.
  • The graph is linear, meaning the bulk of the Tonal Data is in the mids and highs.
  • The graph plus the noise summary are powerful tools for studying image sensors.
  • Spend time with this illustration. It's one of the most powerful photography tools.  


Olympus E450 with the 14-42mm kit lens - ISO100, f7.1, 1/320 - My wife took this OOC jpeg image.


ETTR is a technique we use to control the sensor's SNR to ISO ratio. We can also describe this as managing the sensor's performance or saturation level. Why do we need the highest possible SNR? A fully saturated image sensor gives us the highest SNR with the least amount of visible image noise. Higher ISO values mean less light on the sensor and lower SNR values. This is why it's critical to carefully select negative exposure compensations or higher ISOs. Use the photons to electrons graph to set the best SNR to ISO ratio for your application and sensor in your camera.

It's critical to familiarize yourself with the information in this article. Don't walk away because others do. It takes practice to appreciate the benefits of the above illustration. I continue to learn new techniques with this powerful tool. These exposure techniques are especially effective with older cameras with low-sensitivity image sensors. Implementing this knowledge is as simple as the example in section 2. You will discover more solutions as you practice.

6. The various kinds of CMOS image sensors

Photographers should know the different types of CMOS sensors in digital cameras. This will help them evaluate and select the best camera for the job...


7. A basic illustration to summarize all image sensors

I always considered the absolute focus on sensor size counterproductive. The reason is Pixels capture Photons and not the size of the sensor. The information in this article is enough to improve your digital photography results. Practice regularly until you are more confident with these basic concepts. It takes effort to walk away from the oversimplified "size and capture" theory...


The sensor's Pixel area and pixel sensitivity reduce when we up the resolution. This should be general knowledge for all photographers. Instead, most photographers think it's all about cropping. Smaller pixel areas reduce the optical efficiency and ability of the pixels to resolve fine details, especially shadow detail. More pixels also add more pixel wiring (control circuits). More components increase the sensor's noise floor. So much happens at the sensor's pixel level that it's dishonest and rude to make photographers think large sensors and cropping are the most important things.

For example, why should M43 photographers be interested in a used Panasonic GH5S?


Conclusion

This article teaches photographers more about the importance of pixels while studying the camera's image sensor. We also reviewed the most critical knowledge each digital photographer should have. The article also gives a new perspective on the different variables impacting the efficiency of the Image sensor. We also studied the role photographers have in achieving good image quality. We saw how photographers manage the image and video quality they get from their cameras.

What do we need for an equivalent image sensor comparison?

  • The sensors should be the same type - (Standard CMOS, BSI, or Live MOS)
  • They should have similar resolutions - We can't compare a 20MP with a 40MP
  • The same firmware and pixel control circuits - That means the same AST and SNR
  • The effective percentage pixel area should be the same for the different sensors
  • The sensor sensitivities (optical and quantum efficiencies) should be similar
  • And many more...

Pixel area is the only variable changing with a theoretically equivalent comparison. Let me know when you find an example of two or more sensor sizes (cameras) with equivalent characteristics.

Best

Siegfried

VideoPic Blog Comments

Please add any comments to this article here.