Featured Post: Discover new exposure techniques, which are based on a digital exposure triangle and the image signal flow diagram.

Feb 10, 2024

A new OM-System Pen F II

Last Update:- 20th October 2024

Introduction.

I invite all Olympus photographers who enjoy Creative Color, and Monochrome profiles to come and dream with me about a future OM-System Pen F II. I discussed my preliminary reasons for a real OM-System camera in my OM-1 II overview. OMS has a unique opportunity to follow the visionary design achievements of Olympus while designing the Pen F II and a new User Interface. The user interface of cameras stagnated in the past 12 years because manufacturers focussed on the analog feel of digital cameras. We mainly saw higher-resolution flippy displays with new and different menu displays.

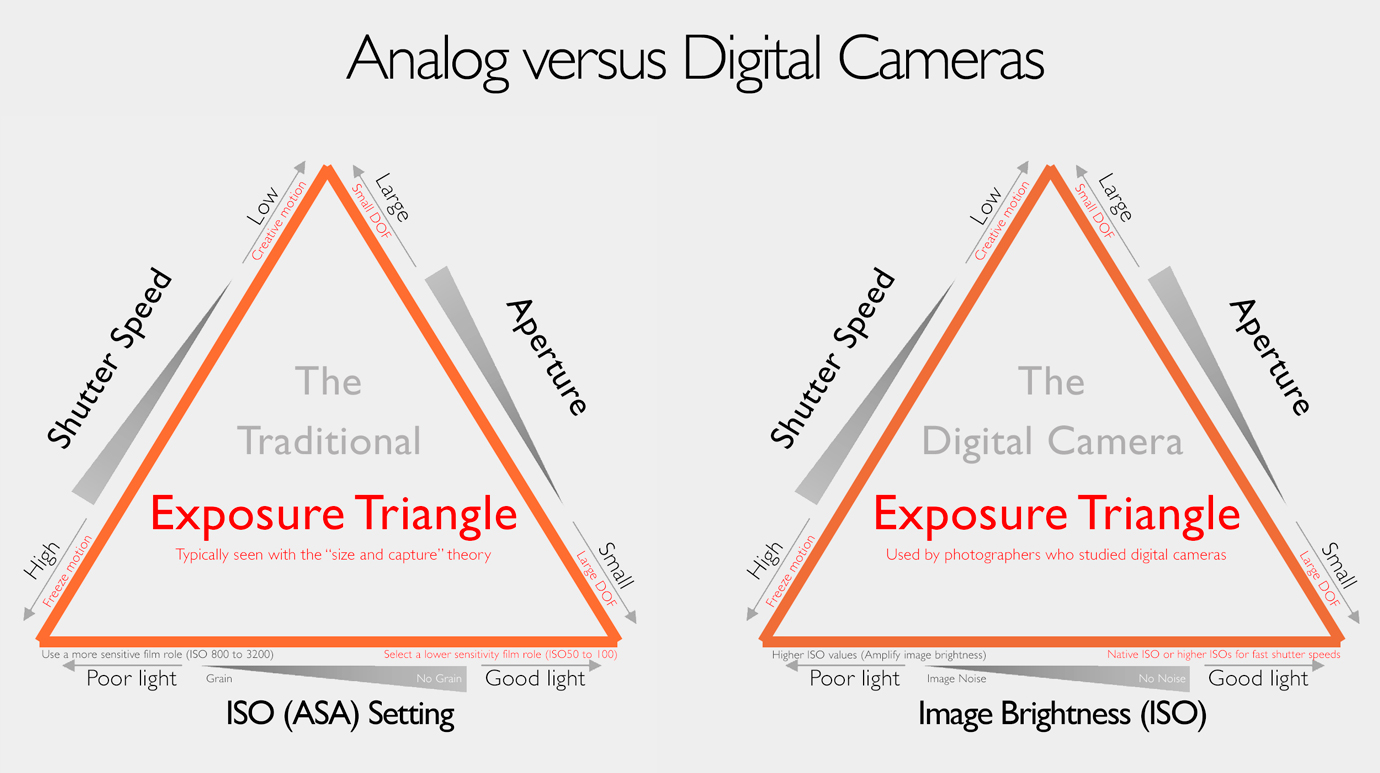
Imagine digital photographers using cameras with flippy displays and basic Aperture, Shutter, and ISO display data. Imagine digital photographers using the analog Exposure Triangle and treating digital camera sensors like old film cameras. Imagine this is the status quo in 2024 because photographers are told sensor size is everything and they should only rely on the "best" Sony image sensors.


The Olympus SCP was a great idea from the 4/3 DSLR days. Picture source.

Have you ever wondered why reviewers rejected the Olympus Pen F in 2016? One of the many "size and capture" myths is larger sensors produce "more" colors. Global marketing departments pushed back when Olympus introduced the Creative Dial and access to the TruePic ART Controller. The Pen F was the first consumer camera that adjusted individual colors versus creating global color effects.

For example:

  • The Color Creator creates global color effects like a chrome effect,
  • The Adjust Color function targets individual colors on the color wheel,
  • Saturation, Tones, and Contrast are simplified global adjustments.

The rangefinder Olympus Pen F is a popular day-to-day and street photography camera with access to small compact lenses, and unique MonoChrome plus Color Profiles. Many M43 photographers never used Workspace to improve their Pen F skills or create personalized monochrome and color profiles because social media advisors are either ignorant or simply provide incorrect information.


It's fascinating that camera manufacturers never used sensor and CPU data to give us more options like calculated hyperfocal distances, Aperture plus Shutter effects, focus stacking, and fill-in flash info on the camera's display. Modern motorcars are great examples of using available processed data to enhance the driving experience. For example, how often do we increase our ISO without knowing it's possible to drop the ISO with 1EV when changing the focus and exposure combinations? 


The Pen F II user interface should display more processed data from the sensor and TruePic Processor. Please design a new user interface with a Sensor Performance Meter and more advanced features, like hyperfocal focus distances and a DOF meter. Focus on giving the photographer control while using the camera. Study this article for more about the next generation of OM-System cameras.

The Sensor Performance Meter is based on the following:-

  • Keep the Aperture, Shutter, and ISO displays but add more sensor control.
  • All image sensors have a Noise Floor. This is a known technical limitation.
  • We control the image signal SNR and the visibility of the sensor's noise floor.
  • Shutter Speed, Aperture, and ISO are part of the Exposure Formula, BUT:
    • The Aperture and Shutter control the light to (exposing) the sensor.
    • The ISO amplifies the image signal. Sensor sensitivity is factory set. 
  • Sensor Saturation and IQ improve with more Reflected Light on the sensor.
  • The reverse happens (more visible noise) when the sensor receives less light.
  • The ISO function does NOT create noise. The sensor received too little light.
  • The camera's Auto Exposure (default) settings focus on Good Image Quality.
  • The synergy between Enhanced Raw Files, OMS cameras, and WS is critical.

Study this article for a detailed explanation of the DxO "Good Image Quality" ratings.

Study this article for more info on exposure and how to use ISO "Image Brightness."


Olympus photographers will benefit from a new Sensor Performance Meter because it will improve the general understanding of sensor saturation and image noise. It will also enable OM-System to take the lead by proactively managing repetitive "sensor size" and the "best" AF promotions after each M43 camera launch. See my OM-System OM-1 II overview for more about a new OMS camera...

How would Sensor Saturation and SNR "exposure" data benefit us? Because it's possible to manage the sensor's performance separately from the ISO. It lets us think differently about the ISO, Aperture, and Shutter Speed, while opening new creative opportunities, like using a saturated sensor at a lower ISO (image brightness) to control highlights. We can correct the image brightness in Workspace because a saturated sensor lets us lower the ISO and re-adjust it with the Workspace EC slider. This is why the Sensor Performance Meter has an A/B display option. See this article for more...


What more could we expect from a new OM-System Pen F II?

The quality of the new Pen F II should mirror the current model. It should have a high-sensitivity 24MP (Live MOS) BSI sensor with a smaller noise floor and an advanced User Interface. The target segment is street, family, travel, event, and hobby photographers. The focus should be creative computational features. The AF system should be a clever derivative of the EM1 III (EM1X) AF technology.

The focus should be creativity, flexibility, IQ, profiles, and a Workspace App for tablets and Mobiles. Please study the needs of your target segment for new computational and creative features.


Here are some additional suggestions for a new Pen F II:-

  • Go back to high-quality metal camera bodies. Pls not like the Pen EP-7.
  • New Hue and Luminance options for the camera's Color Adjust function.
  • Add new Clarity and Dehaze sliders (Workspace) to the camera's menu.
  • Create a function to copy and paste color information from Workspace.
  • Rethink the ISO function by expanding its link to the Workspace EC slider.
  • This camera should have a high-res EVF and display with advanced features.
  • The new Sensor Performance Meter simplifies sensor Saturation and SNR.
  • A graphical DOF slider and new AF options to optimize aperture selections.
  • Flexible Tonal Profiles with new options to tweak the Tonal Response Curve.
  • If a brand thing, focus on the following AI "application" features:-
    • Landscape DOF automation (AI) plus control.
    • Unique AI features for street photographers.
    • People, family events, and children AI features.
    • I am no macro guy. Do they have any AI ideas..?
    • Focus AI on applications and NOT image processing or autofocusing.
  • ANY new TruePic image processors should NEVER use AI to process images.
  • Build new creative communities to discuss and share info and color profiles.
  • The focus should be flexibility, image quality, color, and wifi communication.
  • 8EV IBIS, more Multi-Aspect Ratios, and quick handheld 50MP High Ress.
  • The TruePic IX or X image processor with a vertical social media video option. 
  • Design selective improvements for the Workspace video editing function.
  • Add a basic version of a Layers function to Workspace with Blending Modes.
  • The video capabilities of this camera should be tailored to the target segment.
  • This is NOT a high-speed Pro Camera for bird and wildlife photographers.
  • This shouldn't be another hybrid. Make it a photography camera with video.
  • The simplicity of the Pen EP-7 is perfect. We only need more creative features.
  • Label this new OM-System camera a Pen-F II to accelerate its growth potential.

Why don't "size and capture" promoters accept this illustration? This information counters the "sensor does everything" myth...

Conclusion


Every digital photographer should get the opportunity to learn more about digital cameras, especially the link between Image Sensors, Saturation, SNR, Exposure formula, and ISO amplification. In fact, it's disappointing to see YouTube presenters using the old Analog Exposure Triangle as a tool for planning and adjusting the digital camera's Optical, Exposure, and ISO adjustments. I can't help but question the seriousness of people ignoring the unique benefits of having advanced digital cameras...


A helicopter overview of the Image Signal Path, Exposure Controller, and Workspace. Study this link.

Jan 24, 2024

Color and FX-Blue Chrome effect for Olympus

Last Updated:- 3rd February 2024

Introduction

The illustration below is a screen copy of my Workspace "before/after" display. Study the links below for a description of the Fuji Color and FX-Blue Chrome effects. I combined these descriptions into one beta Chrome Effect for Olympus. The Fuji Color Chrome effects work for all Fuji "Picture Modes," whereas the Olympus Color Adjust function only works in the "Natural" Picture Mode. The final Fuji Chrome Series for Olympus cameras could be 3 chrome profiles. (Color, blue, and combined)

This short article discusses two processes for developing a new profile. Why are the Olympus EP-7 and Pen-F so different? All digital cameras work with global adjustments like saturation, color filters, and White Balance. They require a good understanding of working with Opposite Colors. For example, the Olympus Color Creator and White Balance functions use analogous and/or opposite colors. Only the Color Adjust Tool of Workspace, Pen-F, and EP-7 target specific colors in the image.

Fujifilm Color-Chrome Effect - link

Fujifilm FX-Blue Chrome Effect - link


Olympus Pen F with beta Chrome profile.

Fuji Color and FX-Blue Chrome Effect - Version 1

The unique aspect of this Chrome effect is the steps I used to create the profile. The profile is my reaction to the two articles discussing the Fuji Color and FX-Blue Chrome effects. This can happen to anyone seeing or learning something new and like to express that experience in a color profile.

Download this 1st beta "Color and FX-Blue Chrome.oes" profile. Use the Batch tool in Workspace to open and save the profile on your PC. See my Workspace How-to page for more...


Fuji Color and FX-Blue Chrome Profile.

The Fuji Color plus FX-Blue Chrome Profile is designed for the Pen-F, EP-7, and compatible OMDs. For example, I successfully tried the profile on Raw files from my EM10 II and the original EM-1. Only the Pen F and EP-7 have the Color Adjust function and will accept Color Profiles. The alternative is to apply these profiles via the Enhanced Raw Format to compatible Pen and OMD cameras.


Study the above profile data (summary) and the steps below to tweak the profile:

  1. Use the "Auto" option for your WB, or select a unique WB. (Critical step) 
  2. Use Exposure compensation and the histogram to set the ISO brightness.
  3. Use the different Tone Adjustments to tweak the camera's Gamma Curve.
  4. Some Olympus cameras, like the EM10 II, do not have a Midtones Slider.
  5. Use Exposure Compensation for those cameras lacking a Midtones Slider.
  6. The Auto or Normal Gradation option varies your final Tone Curve shape.


Olympus EM1 II with 18mm f1.8 lens - ISO200, f7.1, 1/800. The Enhanced Raw File was converted with the Fuji Chrome Profile.

The Tonal Adjustments in the Camera and Workspace are Gradation, Shadows/Midtones/Highlights, and the Workspace Tone Curve option. Why do we need ISO brightness (EC) and separate Tonal Data Adjustments? Workspace and the camera's Gamma Curve convert the sensor's linear raw data to a human (JPEG) format. Tonal adjustments let us tweak the Gamma Curve in the camera and Workspace. Exposure Compensation (ISO) is part of the camera's Exposure Formula.

Study this article for more on exposure compensation, image brightness, and ISO.


Olympus E-P7 with 17mm f1.8 lens - ISO100, f8.0, 1/200. The enhanced Raw File was converted with the Fuji Chrome Profile.

Use the Color Adjust tool of Workspace to tweak the Chrome effect. I studied the above information from Fuji and converted +/-50 Enhanced Raw Files to create this Beta profile. What is the next step? The next version of the Fuji Color Chrome effect will be based on Color Cards and Test Images from my Fuji XT-5 and the Olympus Pen-F. Mail me your feedback or input for the 2nd version.


An example of using multiple steps. 1. Tweak the Natural Picture Mode. 2. Tweak the Color Style. 3. Image jpeg adjustments.


One could also use multiple steps to create a unique image look. This is a more advanced option because the different steps happen simultaneously. We can add another level with the Luminance and Hue options of the Color Adjust tool. The Pen F and EP-7 do not have these options. The first step is global adjustments (opposite colors), and the second is specific colors. (Adjust Color Function)

For example:
  1. Tweak the Picture Mode via Color Filters and the White Balance.
  2. Tweak the colors in the Color Style with the Adjust Color function.
  3. Jpeg adjustments like Contrast, Saturation, Clarity, Dehaze, and Sharpness. 

Olympus Pen-F with the 9-18mm f4-5.6 lens - ISO200, f4.5, 1/1250 - Version 2 of the Color Chrome effect.


Fuji Color and FX-Blue Chrome Effect - Version 2


I used a "controlled" studio, standard camera settings, and Color Cards. Both cameras were in Manual Mode, with the XT-5 at ISO125 and the Pen F at ISO200. That meant I needed to correct the ISO brightness of the XT-5's raw sample in Fuji's X Raw Studio. I exported the different raw images as 16-bit Tiffs. That meant the color samples were ready for Workspace and the Adjust Color tool.

I used these 16-bit samples in the "Compare Multiple Images" display of Workspace. This enabled me to copy the XT-5 "chrome effect" and transfer it to the Pen F color card. The illustration below shows the original and the new Adjust Color Style for my Fuji Color and FX-Blue Chrome effect. 

You are welcome to download the new version here. - link


What is the main difference between these profiles? The Color Cards allowed me to create a more accurate version of the Fuji Color and FX-Blue Chrome effect. Only the Adjust Color tool has the new Color Style values. None of the other functions were used to create the new Color Style. This allowed me to use default values for the remaining Camera and Workspace settings. Verify that only the Adjust Color tool was adjusted before you continue to edit the profile in Workspace.

The previous version of the Fuji Chrome Profile was created from the information I found. The profile consisted of a combination of the Adjust Color function and other image settings. As can be seen, this method is not necessarily incorrect. It's simply a creative reaction to general information. The second method is more reliable because I used a different Color Card for each camera.

The new Fuji Color and FX-Blue Chrome effect has a specific Color Style. We only need the color style to apply the new profile. Any other image tweaks, like Tonal Adjustments, are unique to the scene. This makes the new profile very unique. It lets users develop a basic step-by-step process for using the profile and editing images with the new Fuji Color and FX-Blue Chrome effect.


Olympus OM10 II with 17mm f1.8 lens - ISO200, f3.2, 1/2500. Workspace with Version 2 of the Fuji Chrome effect.


More info on the Fuji V2 Chrome Effect? The final profile is not only more accurate, but it is also more user-friendly. How could that be? Workspace has become my default raw converter and editor in the past two years. Workspace and Photoshop cover +95% of my editing needs. I export my converted 16-bit Tiff files to Photoshop. Like everything, the more we use it, the more we learn.

The new profile highlights one of the main differences between Olympus and other brands. Almost all brands use global adjustments, whereas Workspace, the Pen-f, and the E-P7 allow us to adjust global and targetted colors. Targeted colors are unique for Workspace, Pen-F, and the EP-7. What makes it different is that the camera's Adjust Color Style is part of the Enhanced Raw Format.


Olympus Pen-F with 17mm f1.8 and the new Fuji Color Chrome effect.


It's critical to master the main difference between targeted and global settings. The Color Creator is an example of using Global Settings. The Color Creator, White Balance, and Color Filters change the selected and opposite colors. Color profiles created with Global Adjustments need additional steps, like tweaking the Image jpeg Settings. Targeted color profiles are only done in the Adjust Color tool. The resulting configuration defines the new Color Style. That means more freedom to edit and tweak the remaining image (scene) settings because the Color Style stays fixed.


How to use the new Fuji Color Chrome Profile? The first step is studying the above chart. The next step is downloading the new profile. Save it in your Workspace profile folder.

Do the following steps to open and edit your Fuji Color Chrome effect in Workspace:

  • Open any Pen-F or EM1 Raw file and select the "Load Batch Processing file" option.
  • View the camera settings in Workspace. You will see only the Adjust Color was used.
  • The Adjust Color settings show the Color Style. That means you have the right profile.
  • Study the above chart for tips to tweak and edit your image. Apply small adjustments.
  • You can apply the following editing steps in Workspace:-
    • Focus on the critical Raw settings like (ISO) Exposure Compensation and WB.
    • The next step is to tweak the Gamma Curve with different Tonal Adjustments.
    • The final step is typical Jpeg Image Adjustments and the Noise Filter selection.
  • Adjust the Fuji Color Chrome effect (Weak/Strong) with the Adjust Color function.


Olympus Pen-F with 9-18mm F4 lens - ISO200, f4, 1/1000. The Pen-F with the Fuji Color and FX-Blue Chrome effect.


Everyone should try the color samples below to create a Fuji Color Chrome effect. For example, I only used saturation with the Adjust Color function. You could add Hue and Luminance adjustments for a more accurate profile. I used saturation adjustments in Workspace because I wanted the new Fuji Color Chrome Profile ready for my Olympus Pen-F and the EP-7.

Conclusion

The next step is taking a few images with my Fuji XT-5 and Olympus Pen-F. This is the best way to test the new Fuji Color and FX-Blue Chrome effect for Olympus. The challenge is the winter season, with poor conditions and cold photo walks. That means my final testing will wait a while...

Best Regards

Siegfried


Olympus EP-7 with 17mm f2.8 lens - ISO200, f5, 1/200. The EP-7 image with the Fuji Color and FX-Blue Chrome effect.


Use these Color Samples and Workspace to create your Chrome Profile.


Jan 6, 2024

Improve your photography with these essentials...

Last update:- 5th February 2025

Introduction.

Many YouTubers started 2024 with basic photography essentials. While most have good intentions, it's disappointing when popular influencers present inaccurate information. For example, the exposure triangle used in digital photography training courses applies to analog cameras. Most photographers, therefore, never get the chance to leverage the unspoken capabilities of digital cameras. These basics inspired me to introduce an advanced exposure technique plus the following essentials:

  1. "Focus" on the subject, and don't let the background or DR distract you.
  2. Exposure Triangle - Replace "ISO Sensitivity" with "Image Brightness."
  3. Ignore all "size and capture" theorists discussing image sensors/cameras.
  4. Knowledge and experience are critical aspects of the digital photography.


Imagine you are doing sunset or blue hour photography, and it's possible to lower the image brightness just enough to ensure acceptable image quality in highlight areas like shop windows, streetlamps, and restaurants. For example, how did I photograph the images below? I used an interesting exposure technique, which takes advantage of the aperture/shutter combination exposing the sensor and the ISO function amplifying the image signal from the sensor. That means I manage sensor saturation and SNR separately from the final image brightness (ISO amplification).

See the DxOMark link further down for more on acceptable IQ.

Study my articles about the 4th exposure variable. The exposure technique in the example below benefits from an optimum scene luminance balance. The 4th exposure variable changes with the time of day or by adding more light to the scene. We can do so much more with digital cameras...


Figure 1.

1. Focus on the subject, and don't let the background distract you


I'm a keen follower of the Danish photographer Thorsten Overgaard. I appreciate his work, enthusiasm for Leica cameras, and passion for photography. Thorsten introduced 4 new Essentials to improve our photography in 2024. Many influencers and photographers think the ISO function on digital cameras is similar to film cameras. See Thorsten's video for his thoughts on focusing on your subject...


The digital camera's ISO function does NOT change the sensor's sensitivity!


2. Remove "ISO Sensitivity" from the Exposure Triangle

The best way to view the ISO function on digital cameras is to consider it a brightness adjustment, which correlates with the exposure compensation slider in Workspace. The shutter and aperture exposing the sensor and the ISO amplifier are separate variables in the exposure formula. The sensor's sensitivity is measured and set at the factory. It's a one-off adjustment to align the sensor output to digital cameras. The ISO function amplifies the image signal from the sensor or pixel.


See this article for more information on the exposure mix.


A personal experience with M43 cameras changes everything. Full-frame marketers try to prevent that with marketing theories like "bigger is better." For example, why should I buy an OM-5 II or the OM-3 if they are inferior to full-frame cameras? It is almost normal for respected influencers to suggest that M43 cameras have inferior image quality. There are also several videos suggesting that the high-resolution mode delivers inferior results to 40 MP or higher FF cameras. Why would people think OM Workspace is inferior to the commercial RAW converters from Adobe and DxO? Shouldn't the logical alternative be to convert your high-resolution RAW files with Workspace or the TruePic X processor, especially with the new and improved PC-RAW mode of the OM-1 Mk I/II and the OM-3?

We are reviewing the benefits of knowing it's possible to manage the sensor's saturation and image brightness (ISO) separately. This knowledge changes how we apply our digital cameras...

See this video discussing more on advanced exposure techniques...


EM5 II & 7-14mm f2.8 lens - ISO800, f2.8, 1/250. The Advanced Raw File was converted in WS. The new ISO technique will benefit this photo...

The information below applies to all digital cameras:

  1. The Shutter and Aperture are responsible for exposing the sensor.
  2. The ISO function only amplifies the image signal from the sensor.
  3. Keep in mind the ISO is part of the camera's exposure calculation.


The possible origins of adjusting sensor sensitivity.

Source: dpreview.com - Olympus Camedia C-50 (pre "size and capture" days)

Consider these points when using the Digital Exposure Triangle:

  • Reflected light (Shutter Speed and Aperture) controls the sensor's saturation level.
  • Reflected light saturates the sensor. It improves the SNR, which decreases noise.
  • Less reflected light decreases the SNR. Smaller SNRs means more visible noise.
  • Study the Photons to Electrons conversion graph in my previous articles - link.


EM1 MKI & 12mm f2 lens - ISO1250, f2.0, 1/25. The Enhanced Raw File converted in WS. These scenes benefitted from the new ISO technique.

3. Ignore ALL "size and capture" theorists explaining digital cameras

Study the examples in Figure 1. The image on the left is the JPEG from my EM5 II, and the one on the right is the converted raw file. They are examples of mastering digital cameras and Workspace. They are not AI creations, computational photography, LUT creations, or the result of advanced image editing. Photographers in Group A will typically say the EM5 II has too little dynamic range, and those in Group B will seek more information to improve their photography and image quality.

What about the role of social media influencers? They promote the "idea" that cameras with bigger sensors are better (more efficient). The deliverables are more dynamic range, background blur, image quality, less noise, and more details. Influencers generally refuse to discuss the optical and technical characteristics of modern digital cameras. They also disregard the roles of the photographer, lens, image processor, and firmware by promoting the idea that the sensor does everything.


Olympus EM5 II & 12-200mm f3.5-6.3 Lens - ISO200, f7.1, 1/500. The new ISO technique lets us control any highlights in the above scene.


4. Knowledge and experience are critical aspects of digital photography


Which variables controlled the image look in Figure 1? The final image look is proportional to sensor saturation, image brightness (ISO setting), gamma conversion, and exposure compensation (EC) in the camera or Workspace. The Olympus EM5 II is known for its image quality and a smaller noise floor. See the DxOMark Low-Light ISO rating as it defines acceptable versus good image quality.


It's critical to take a new look at digital cameras. A saturated sensor enables us to manage our image brightness in the camera (ISO) and/or Workspace (EC). We can adjust the camera's Tone Curve with the Gradation function, Highlights/Midtones/Shadows sliders, and/or the Tone Curve in Workspace. Why do we need a new exposure Technique? The new technique is based on the design principles of digital cameras and not random "bigger is better" theories. For example, a saturated sensor means more Dynamic Range (better image quality) and a higher SNR (less visible noise)...

Not all photographers know that the sensor is one of many variables responsible for clipping. Higher or lower image signal amplification (ISOs) can also cause clipping because the ISO is part of the exposure formula. The camera's ISO is similar to the EC function in Workspace.

How do we apply the new exposure technique?
  1. This technique benefits from the Enhanced Raw Format and Workspace.
  2. The Enhanced Raw Format is the link between the camera and Workspace.
  3. Evaluate the reflected light strength/quality and set the ISO to 400 or 800.
  4. Use the histogram to optimally expose the sensor (Aperture & shutter).
  5. Critical - the histogram follows the sensor's saturation at a fixed ISO.
  6. Lower the "ISO with 1/3EV intervals to manage" highlight clipping.
  7. Finalize the image brightness with EC in WS. Export a 16-bit Tiff file.
  8. The final step is editing the exported 16-bit Tiff file in Affinity.
EC = Exposure Compensation.

Olympus E620 w 12-60mm f2.8 Lens - ISO100, f8.0, 1Sec. 3 AE bracketed raw files were converted and edited (HDR) in Photoshop.

Is there another way of creating Photo B? Yes, I used the above method to illustrate the relationship between the camera's sensor and ISO function. Some will say the EM5 II is ISO Invariant. Folks, the "size and capture" and "ISO Invariance" theories are marketing programs. Those pushing them cannot explain why we have image noise, a noise floor, and why all sensors are not "ISO Invariant."

It's possible to manage the sensor's saturation and clipping separately if we know that clipping is not an exclusive weakness of the sensor. For example, the sensor could be perfectly exposed (saturated), while the ISO setting (image brightness) might be causing clipping in the highs or lows...

The following steps explain how I created Image B:

  1. I used Image A to set the default auto exposure of the E-M5 II (ISO200, f4.0, 1/25).
  2. The DxOMark "Low Light" Sports rating showed I could vary the ISO with 2-stops.
  3. That means I could adjust the "highlights" if I kick off with ISO800, f4, and 1/100.
  4. Final setting were ISO200, f4, 1/80 in M-Mode. (No clipping & sensor @ 20% ETTR).
  5. I corrected the image brightness (Image B) in WS with EC and Tonal adjustments.


Olympus E410 w 14-42mm lens - ISO400, f13, 13 Sec. The highlights and general IQ of the E-410 will benefit from this ISO technique.

It takes time to familiarize ourselves with new techniques and improve our ability to manage Olympus Cameras and Workspace. For example, the concept that ALL sensors have a noise floor underlines this new ISO technique. It's possible to control highlight clipping with an optimally exposed sensor. The Enhanced Raw Format enables us to finalize our ISO values in the camera or Workspace.

Here is another method to create Photo B (Fig. 1). Olympus cameras automatically vary the sensor's saturation level with AE Bracketing. That means the camera doesn't change the ISO in AE bracketing mode. Use ISO800 and the "2f 1.0EV" bracketing option to take 2 photos. Manually take another image at ISO200 (-2EV) and the 20% ETTR aperture and shutter values. Do the final image brightness and Gamma Curve adjustments in Workspace and export the image in a 16-bit Tiff format.


Olympus EM5 II w 7-14mm f2.8 lens - ISO64, f7.1, 1/125. ISO64 helped me to up the SNR and saturate the sensor.

Conclusion

Most digital cameras from 2012 onwards have acceptable to good IQ. Modern marketing and collective dynamics continue to push for more image quality. Be aware of the dumbing-down effect of everyday marketing and reject any "bigger is better" theories. Study and master your digital camera.

This article shows the value of knowing your digital camera. It enabled me to manage the sensor's SNR and control clipping highlights. The new ISO technique relies on the DxOMark "Acceptable Image Quality" rating. This gave me the comfort of having a minimum Color Depth of 18, a Dynamic Range of 9EV, and an SNR of 30db, with no ETTR, at ISO800. This new exposure technique is more exciting with the Olympus EM1 III because the new Workspace AI noise filter works from IS800.

Why shouldn't we "expose for highlights?" This "technique" illustrates why social media experts are terrible advisors! What happens when we apply a negative exposure compensation in any of the AE Modes? Many photographers use Aperture Mode and Auto-ISO. It simply means they can't determine if the sensor is saturated or not. It's like being blindfolded when doing photography...

A final example of timing, compositions, and complex exposures.


Alex Nail is a great landscape photographer. He took a group of photographers into the Drakensberg mountains. The vegetation in this mountainous region brought back memories of South Africa. Image quality is not only a function of your camera because all digital cameras have unique strengths and weaknesses. One of the joys of photography is managing the camera's limitations...


VideoPic Blog Comments

Please add any comments to this article here.