
Last update:- 11th February 2025
Introduction.
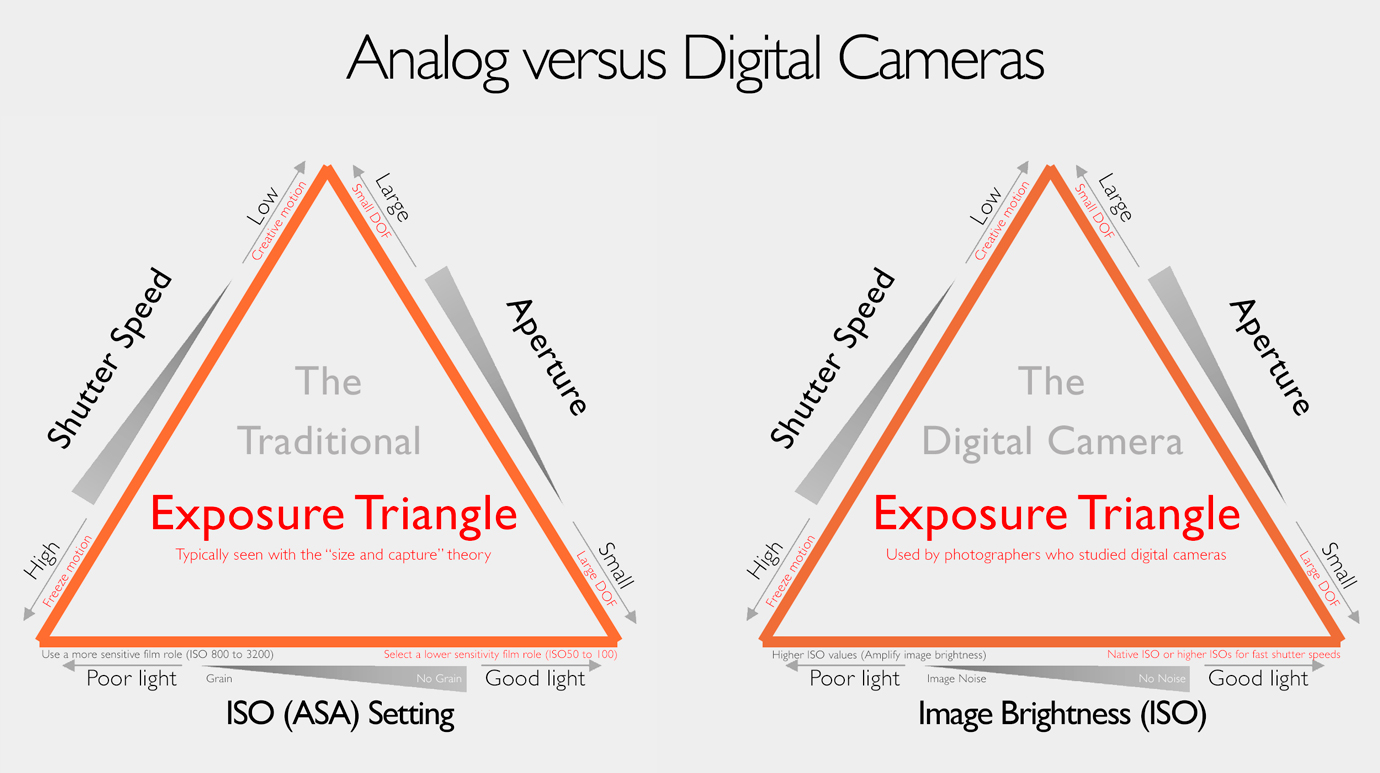
Many YouTubers started 2024 with basic photography essentials. While most have good intentions, it's disappointing when popular influencers present inaccurate information. For example, the exposure triangle used in digital photography training courses applies to analog cameras. Most photographers, therefore, never get the chance to leverage the unspoken capabilities of digital cameras. These basics inspired me to introduce an advanced exposure technique plus the following essentials:
- "Focus" on the subject, and don't let the background or DR distract you.
- Exposure Triangle - Replace "ISO Sensitivity" with "Image Brightness."
- Ignore all "size and capture" theorists discussing image sensors/cameras.
- Knowledge and experience are a huge advantage for digital photography.

Influencers present ISO invariance as a mystery, whereas knowledge explains it...

1. Focus on the subject, and don't let the background distract you
2. Remove "ISO Sensitivity" from the Exposure Triangle
The best way to view the ISO function on digital cameras is to consider it a brightness adjustment, which correlates with the exposure compensation slider in Workspace. The shutter and aperture exposing the sensor and the ISO amplifier are separate variables in the exposure formula. The sensor's sensitivity is measured and set at the factory. It's a one-off adjustment to align the sensor output to digital cameras. The ISO function amplifies the image signal from the sensor or pixel.

See this article for more information on the exposure mix.
We are reviewing the benefits of knowing it's possible to manage the sensor's saturation and image brightness (ISO) separately. This knowledge changes how we apply our digital cameras...

The information below applies to all digital cameras:
- The Shutter and Aperture are responsible for exposing the sensor.
- The ISO function only amplifies the image signal from the sensor.
- Keep in mind the ISO is part of the camera's exposure calculation.
- Reflected light (Shutter Speed and Aperture) controls the sensor's saturation level.
- Reflected light saturates the sensor. It improves the SNR, which decreases noise.
- Less reflected light decreases the SNR. Smaller SNRs means more visible noise.
- Study the Photons to Electrons conversion graph in my previous articles - link.

3. Ignore ALL "size and capture" theorists explaining digital cameras
Study the examples in Figure 1. The image on the left is the JPEG from my EM5 II, and the one on the right is the converted raw file. They are examples of mastering digital cameras and Workspace. They are not AI creations, computational photography, LUT creations, or the result of advanced image editing. Photographers in Group A will typically say the EM5 II has too little dynamic range, and those in Group B will seek more information to improve their photography and image quality.
What about the role of social media influencers? They promote the "idea" that cameras with bigger sensors are better (more efficient). The deliverables are more dynamic range, background blur, image quality, less noise, and more details. Influencers generally refuse to discuss the optical and technical characteristics of modern digital cameras. They also disregard the roles of the photographer, lens, image processor, and firmware by promoting the idea that the sensor does everything.

4. Knowledge and experience are critical aspects of digital photography

- This technique benefits from the Enhanced Raw Format and Workspace.
- The Enhanced Raw Format is the link between the camera and Workspace.
- Evaluate the reflected light strength/quality and set the ISO to 400 or 800.
- Use the histogram to optimally expose the sensor (Aperture & shutter).
- Critical - the histogram follows the sensor's saturation at a fixed ISO.
- Lower the "ISO with 1/3EV intervals to manage" highlight clipping.
- Finalize the image brightness with EC in WS. Export a 16-bit Tiff file.
- The final step is editing the exported 16-bit Tiff file in Affinity.

Is there another way of creating Photo B? Yes, I used the above method to illustrate the relationship between the camera's sensor and ISO function. Some will say the EM5 II is ISO Invariant. Folks, the "size and capture" and "ISO Invariance" theories are marketing programs. Those pushing them cannot explain why we have image noise, a noise floor, and why all sensors are not "ISO Invariant."
It's possible to manage the sensor's saturation and clipping separately if we know that clipping is not an exclusive weakness of the sensor. For example, the sensor could be perfectly exposed (saturated), while the ISO setting (image brightness) might be causing clipping in the highs or lows...
The following steps explain how I created Image B:
- I used Image A to set the default auto exposure of the E-M5 II (ISO200, f4.0, 1/25).
- The DxOMark "Low Light" Sports rating showed I could vary the ISO with 2-stops.
- That means I could adjust the "highlights" if I kick off with ISO800, f4, and 1/100.
- Final setting were ISO200, f4, 1/80 in M-Mode. (No clipping & sensor @ 20% ETTR).
- I corrected the image brightness (Image B) in WS with EC and Tonal adjustments.

It takes time to familiarize ourselves with new techniques and improve our ability to manage Olympus Cameras and Workspace. For example, the concept that ALL sensors have a noise floor underlines this new ISO technique. It's possible to control highlight clipping with an optimally exposed sensor. The Enhanced Raw Format enables us to finalize our ISO values in the camera or Workspace.
Here is another method to create Photo B (Fig. 1). Olympus cameras automatically vary the sensor's saturation level with AE Bracketing. That means the camera doesn't change the ISO in AE bracketing mode. Use ISO800 and the "2f 1.0EV" bracketing option to take 2 photos. Manually take another image at ISO200 (-2EV) and the 20% ETTR aperture and shutter values. Do the final image brightness and Gamma Curve adjustments in Workspace and export the image in a 16-bit Tiff format.

Conclusion
Most digital cameras from 2012 onwards have acceptable to good IQ. Modern marketing and collective dynamics continue to push for more image quality. Be aware of the dumbing-down effect of everyday marketing and reject any "bigger is better" theories. Study and master your digital camera.
INtwresting article but I think I'm only part way to understanding.
ReplyDeleteCould you explain more around " I could safely vary the ISO with +/- 2EV.
That meant the camera's "highlight" exposure settings should be f4 and 1/100 at ISO800."
Iam assuming this is to create an image that captures the highlights for an HDR image?
For +2EV from f4 and 1/25s shouldnt it be a 4 times longer shutter speed with ISO setting remaining at 200?
Thanks
The DxOMark low-light rating says we can safely use ISO800. That is 2EV image brightness. That means my shutter speed will be 1/100 when I up my ISO to 800. This is not a HDR technique...
ReplyDeleteThe ISO setting is part of the exposure formula. It's also important to remember that the camera's aperture and shutter expose the sensor and the ISO only adjusts image brightness.
That makes the question simple. Did the highlights clip because I over-exposed the sensor or increased the image brightness too much?
I updated the article. pls study it again and let me know if it reads better :-)
Thank you for your question.
Siegfried
Very interesting article. I have only recently come across your site, and find it very informative. Despite all the full frame gainsayers I invested heavily in Olympus equipment some years ago, and for the photography I do I have found it to work really well for me. No plans to upgrade to FF.
ReplyDeleteA question on this article, please. I have always used ISO 200 when I can on my Olympus cameras, as this is the level Olympus recommend for optimum results. Of course I do use other settings when circumstances require it, with generally good results if I don’t push it too far. You seem to be suggesting that a base of 800 ISO should be used, shutter speed and aperture selected to give a correct ETTR exposure, and any highlights clipping controlled by reducing the ISO value. I appreciate that reducing ISO to avoid clipping will reduce the actual ISO value somewhat, but it will probably still be higher than the recommended 200. I imagine that you have found the advantages of your new approach compensate for moving away from the recommended ISO? I will give it a go and see how I get on.
I would also like to check that I have understood correctly what you mean by a saturated sensor. I have known about the benefits of ETTR for a long time, and try to use this in practice as much as I can, without clipping important highlights (not always easy to identify in the field sometimes). I ran some tests on my Olympus cameras, and found that the red highlight warnings are pretty accurate compared to what I am seeing in Lightroom - there is perhaps1/3 stop difference. This knowledge is very useful. I have assumed that when you refer to a saturated sensor, you mean a that the sensor has received the maximum exposure possible for the subject, without clipping highlights. Am,I right, please?
Thanks very much for doing the research and publishing these interesting articles for us Olympus fans.
Hello Brian
DeleteThank you for your kind feedback. The key to understanding my ISO800 comments is to study the exposure formula and how cameras function. Also, see my Dramatic Clouds and Exposure Techniques article.
What happens is that the shutter & aperture expose the sensor, and the ISO is simply a brightness amplifier. That means the sensor might be perfectly exposed while the ISO setting is responsible for the clipping. They are all part of the exposure formula...
That does not mean I suggest to use ISO800. I want people to understand the role of each setting. For example, how does one see what happens on the sensor? Simply fix the ISO, and you will see any shutter/aperture changes on the histogram (this means as the sensor's exposure levels change)
The default ISO (ISO200) means the sensor performs at its best (max saturation & SNR levels). Study my photon to electron graph... Study the above article about dramatic skies and the photons to electrons graph. It takes a while to fully appreciate the value of working with theoretical information. Please ask again if sensor saturation is still not clear to you. Yes, the sensor is fully saturated (max DR, IQ, and less noise) when properly exposed...
Have a look in Workspace. It's possible to set the warning levels of the histogram in the camera. These are shown with different colors in Workspace. These pre-warning colors help us when we convert raw files and edit them in Photoshop.
I hope this helped Brian.
Best
Siegfried